How to Do Bicycle Crunches

Bicycle Crunches: Step-by-Step Instructions

Bicycle crunches requires proper form to reap all the benefits.
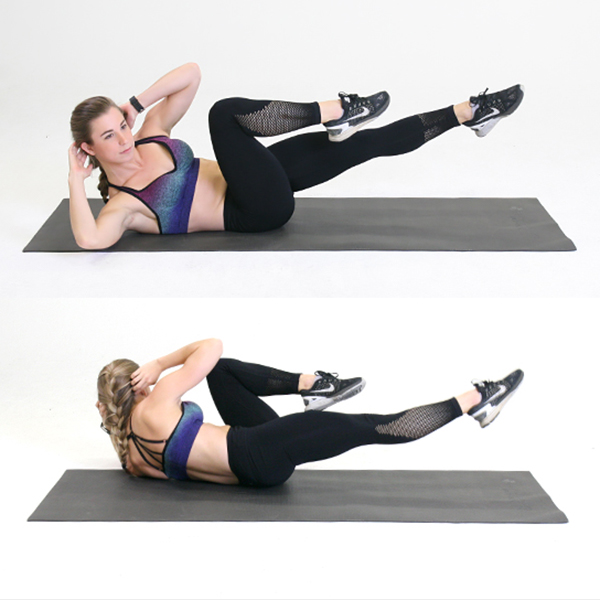
- Lie on your back with your legs out straight, and interlace your fingers behind your head, gently resting your head on your fingers. Keep your elbows pointed out to the sides and try to relax your neck.
- Press your lower back to the ground, engage your core to lift your shoulder blades off the ground, and bring your right knee in toward your chest as you rotate your torso to bring your left elbow toward your right knee. Keep your left leg straight.
- Reverse the motion by straightening your right leg as you bend your left leg and bring it in toward your chest as you rotate your torso to bring your right elbow toward your left knee.
- Continue for reps, and once you’ve conquered the proper form, switch legs and rotate faster to introduce a cardio element. Your lower back should stay on the floor for the whole movement.
Benefits of Bicycle Crunches
“Bicycle crunches are good for functionality because they work multi-plane motions,” says Jesse Levy, NASM-CPT. “Even though you are lying on your back, your abs are fully engaged when you squeeze them tight during the full length of motion. We’re also adding in transverse twisting that engages the oblique abdominal muscles as well.”
Bicycle Crunch Variations
The bicycle crunch can easily be modified to be easier for beginners, or it can be made harder for a more challenging abdominal workout.
1. Hammer run
- Lie face up on a mat with your arms at your sides (palms down), legs raised, and hips and knees bent 90 degrees so that your lower legs are parallel to the floor.
- Lift your head and shoulders off the mat, and begin pedaling your legs, keeping them close to the ground and fully extending each leg as you kick.
2. Knees to 90 crunch
- Lie on your back with your hips and knees bent 90 degrees. Place your fingertips behind your ears.
- Lift your shoulders off the ground and sweep your arms in an arc, so that they end up reaching towards your heels.
- Reverse the move to return to the starting position, and repeat.
3. Standing bicycle crunches

Bicycle crunches can be done on your back (as explained above) or standing up. A standing bicycle crunch is a good option if the horizontal version hurts your back and neck, and you need to build up your core strength.
- Start standing with your feet hips-width apart. Place your hands on either side of your head by your ears with your elbows out wide.
- Keeping your torso upright, use your ab muscles to lift your right leg up to meet your left elbow in a twist.
- Return to center and repeat on the other side.
Bicycle Crunches Muscles Worked

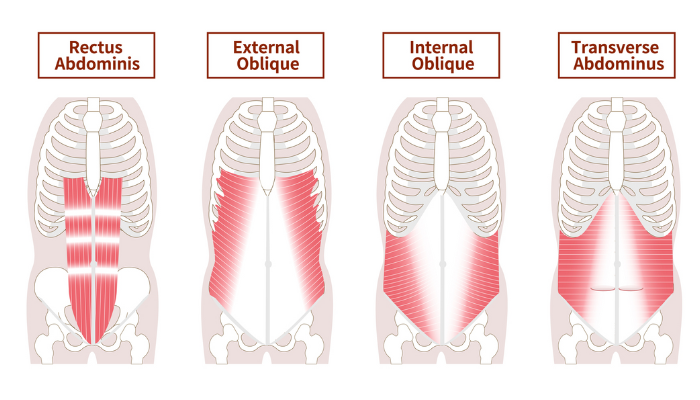
Bicycle crunch workouts strengthen many parts of your core, including the rectus abdominis, which stabilizes the pelvis and keeps the low back from extending as the legs move.
This exercise also places a heavy focus on the inner and outer oblique muscles.
Building up these muscles can help build a strong, defined waist line, and these muscles also help with functional, day-to-day activities as well.
By working the obliques, you build the muscles that help with bending your torso from side to side, and twisting and rotating.
You’ll improve your core power to help with good posture and support any movement of the spine.


Sit-ups and crunches work your abs, but they aren’t the only exercises you can do to build a strong core. It’s important to incorporate moves that target your obliques — like bicycle crunches.
The bicycle crunch is a no-equipment, beginner-level ab exercise that you can do anywhere. It’s performed while lying on your back, and it involves twisting from side to side.
This exercise helps strengthen not only your rectus abdominus (those six-pack ab muscles), but also your internal and external obliques. These are the muscles on the sides of your torso, which can help you get chiseled abs and provide central support for your body.
Read on to learn what bicycle crunches are and how to do them step by step.