14 Exercises for Lower Back Pain

The source of lower back pain can be hard to trace. Sometimes it’s a sudden, jarring injury. Other times it’s due to long-term over- or underuse.
Often the simple act of sitting (which most office workers do for an estimated 10 hours a day) is to blame for lower back pain, particularly if it emanates from around L1-L5, the vertebrae between your rib cage and your pelvis.
Unfortunately, strength and flexibility only do so much to prevent it.
“There are people who can twist themselves into a pretzel who have back pain because they lack endurance,” says neurophysiologist Chad Waterbury, author of Huge In a Hurry. “And there are people who are very strong who get back pain because they lack mobility, especially in the hamstrings, core, glutes, and hip muscles.”
The key to preventing lower back pain, says Waterbury, is building a combination of moves that improve your mobility and endurance so you can get some relief from the lower back pain you have — and avoid more of it in the future.
That’s exactly what the moves below — broken into three escalating levels of intensity — are designed to do.
A few quick caveats: If your pain is intense (read: getting out of bed feels like you’re going one circle deeper into Dante’s Inferno), get cleared by a doctor before doing any type of exercise—these moves included.
If given the OK, avoid anything that causes or exacerbates pain in your lower back. This includes twisting or bending forcefully and sitting for hours on end.
If you can, get up from your chair every 20 minutes, or better still, get a desk with a stand-up option.
If you feel pain doing the exercises below, shorten the range of motion or perform the moves more slowly.
Still hurting?
Follow the “if it hurts” modifications alongside each move.
And if none of these changes help, save that move for another day. Remember you’re trying to alleviate your lower back pain, not make it worse!
14 Exercises to Help Relieve Lower Back Pain
LEVEL I: When your pain is acute, use these easy moves to gently mobilize — increase the pain-free range of motion — in your back.
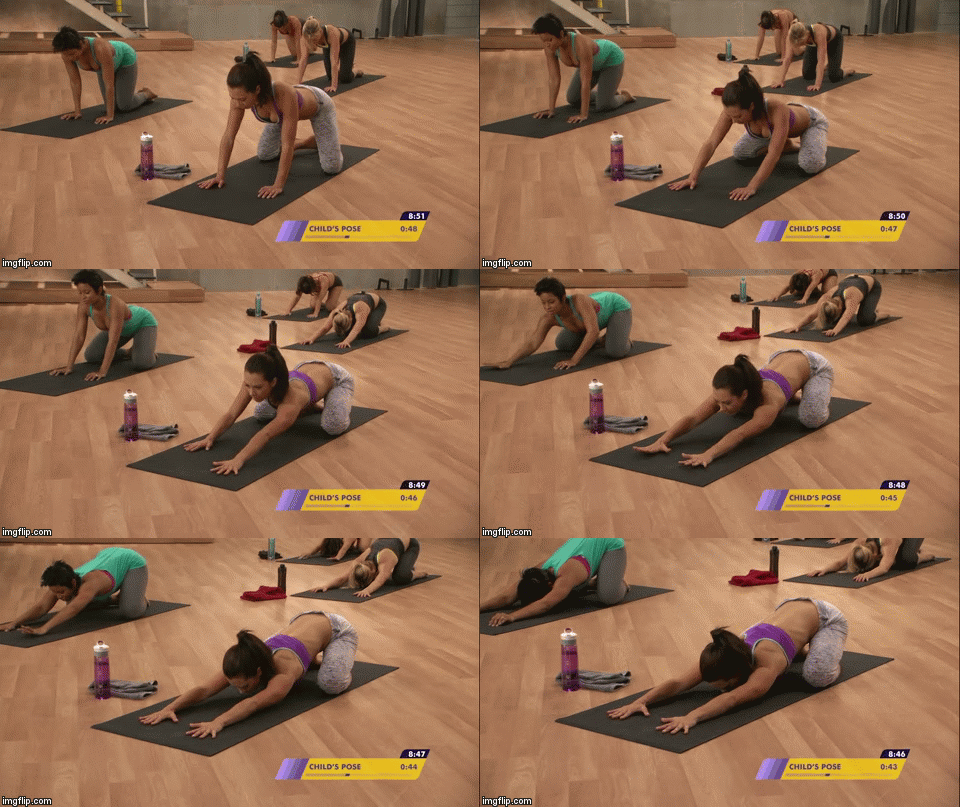
1. Child’s Pose
Gently relieves tension in the lower back.
Source: 21 Day Fix, Yoga Fix
To Do This Exercise:
1. On a mat or blanket, kneel down, and, if possible, sit on your heels.
2. Lean forward, extending your arms in front of you, and rest your head on the floor in front of you.
3. Hold the position for 30 seconds to two minutes.
If It Hurts:
Cross your arms on the floor and rest on your forearms.
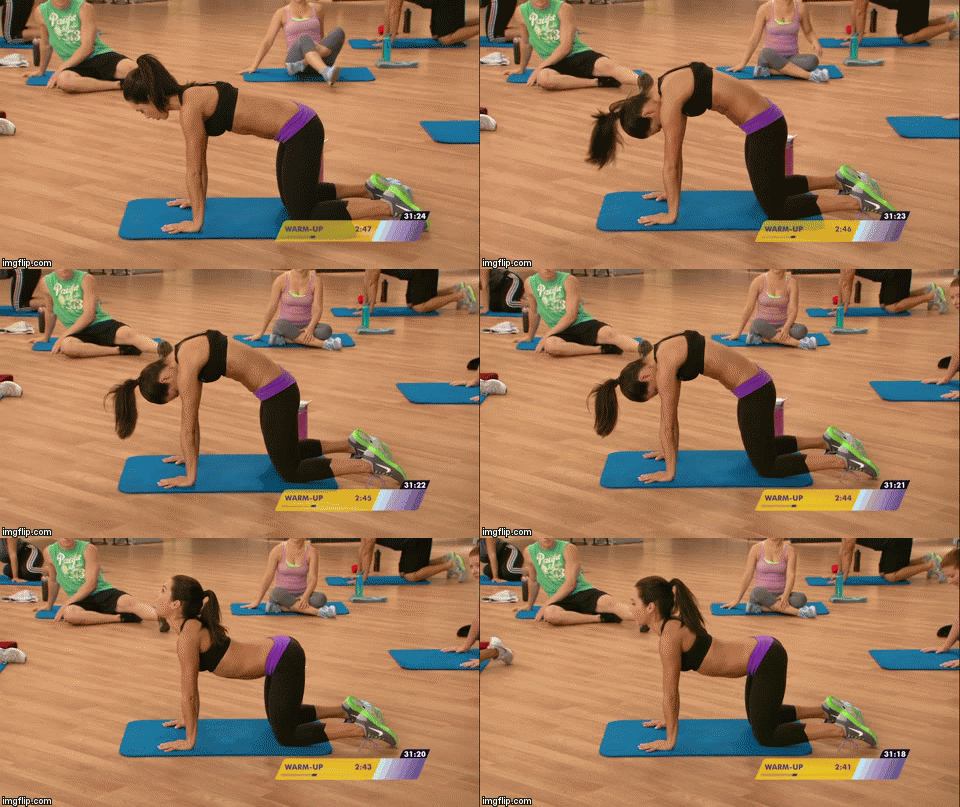
2. Cat/Cow
Easy stretch for forward and backward movement along the entire spine.
Source: 21 Day Fix, Pilates Fix
To Do This Exercise:
1. Assume an all-fours position, hands under shoulders, knees under hips, back in a natural arch, head in alignment with your spine.
2. On an exhale, slowly round your back towards the ceiling, lowering your head fully towards the floor.
3. Reverse the movement.
4. Keeping your arms straight, inhale as you arch your back, bringing your chest and belly towards the floor, your shoulder blades together, and your head up.
If It Hurts:
Reduce the range of motion and move more slowly.
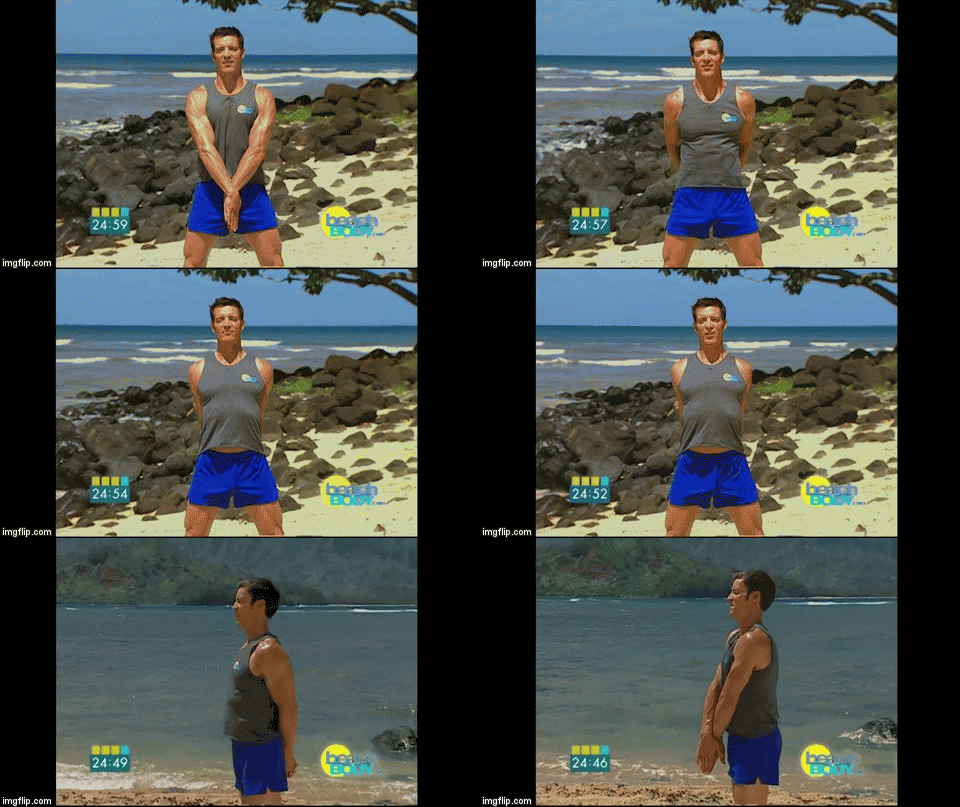
3. Front-to-Back-Shoulder Squeeze
Increases range of motion in shoulder blades, helps reduce slouching.
Source: Ho’Ala ke Kino
To Do This Exercise:
1. Assume an athletic posture with your feet in a shoulder-width-and-a-half stance.
2. Keeping your back straight throughout the movement, cross your left hand over your right, press your palms together, straighten your arms, and point your fingertips towards the floor.
3. Press your palms together and round your upper back as if trying to touch the fronts of your shoulders together in front of you.
4. Hold for ten seconds.
5. Unclasp your hands, then interlace your fingers behind your back, straighten your arms and lift your chest high.
6. Hold for 10 seconds.
7. Alternate these two positions a total of 3-4 times.
If It Hurts:
Don’t stretch as deeply.
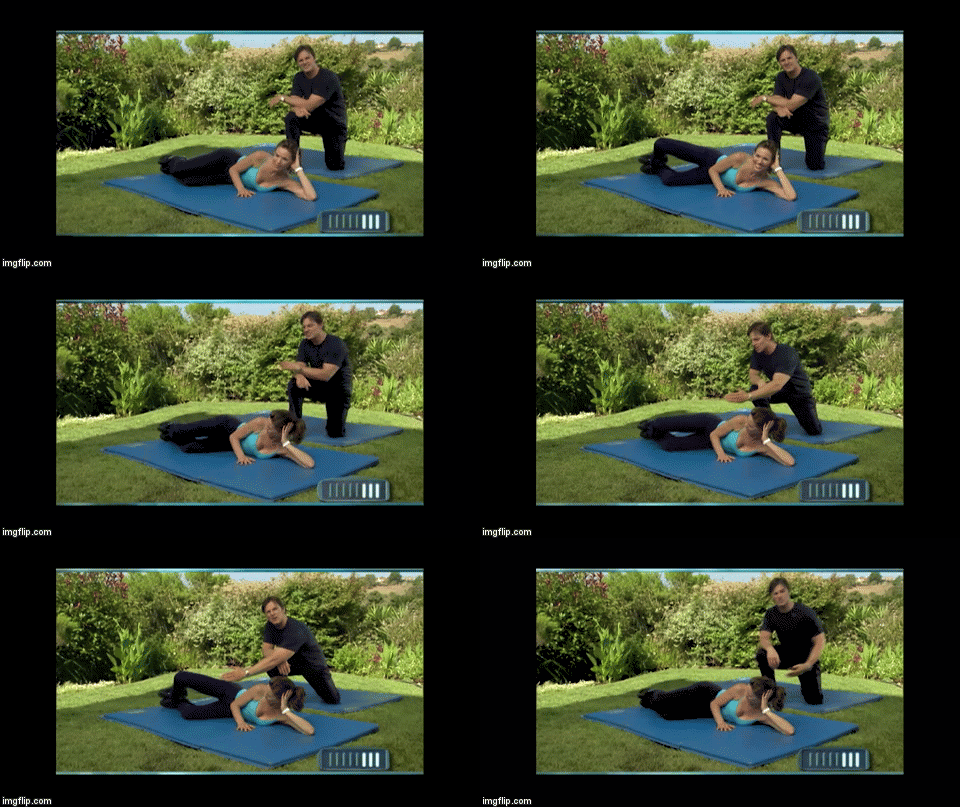
4. Clam
Supports healthy hip movement, which takes pressure off the lower back during everyday activities.
Source: Total Body Solution, Lower Back
To Do This Exercise:
1. Lie on your left side with your knees bent 90 degrees in front of you and your feet stacked.
2. Keeping your feet together and your hips vertical, lift your right knee as far away from your left as possible.
3. Hold for a moment, return to the starting position, and repeat for 15 reps.
4. Turn onto your right side and perform 15 reps.
If It Hurts:
Make sure your lower back doesn’t twist throughout the movement and limit the move to a pain-free range of motion.
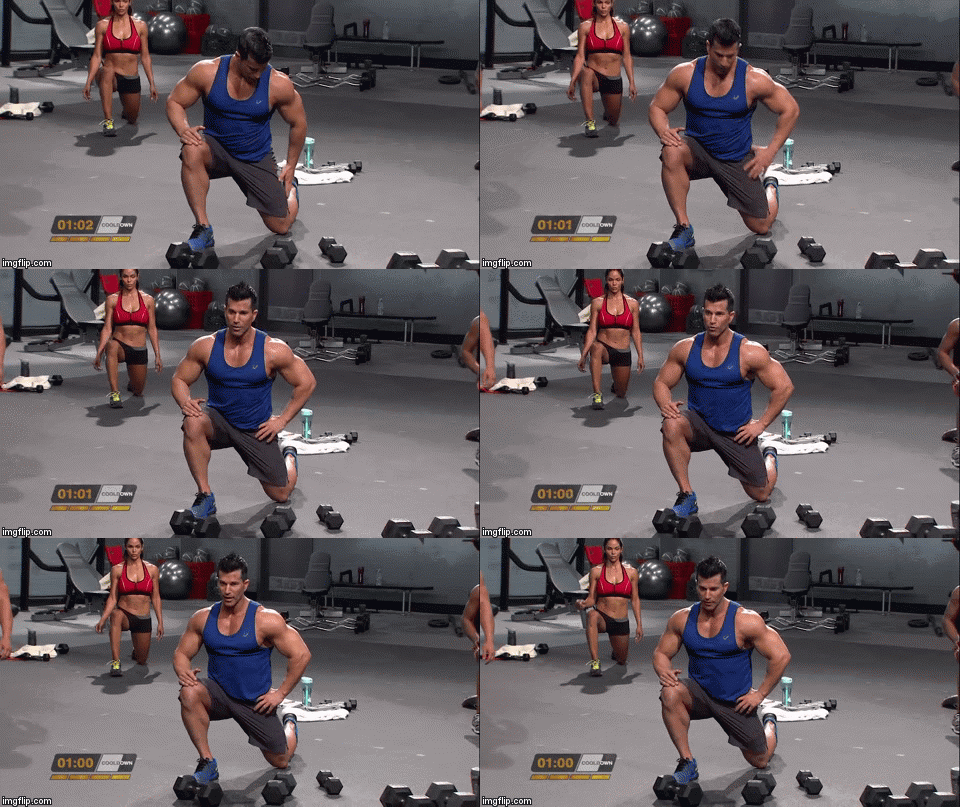
5. Kneeling Hip Flexor Stretch
Restores proper positioning of the hips, taking tension off the lower back.
Source: The Master’s Hammer and Chisel, Hammer Conditioning
To Do This Exercise:
1. Kneel on a mat or pad and step your right foot flat on the floor in front of you.
2. Keeping your torso upright and your back in its natural arch, lunge forward towards your right foot.
3. Press the top of your left foot into the floor behind you.
4. Hold the stretched position for 30–45 seconds, then switch sides and repeat.
If It Hurts:
Contract your abs and flatten the lower back as much as possible throughout the stretch. Also, try shifting your hips back and coming out of the stretch a bit.
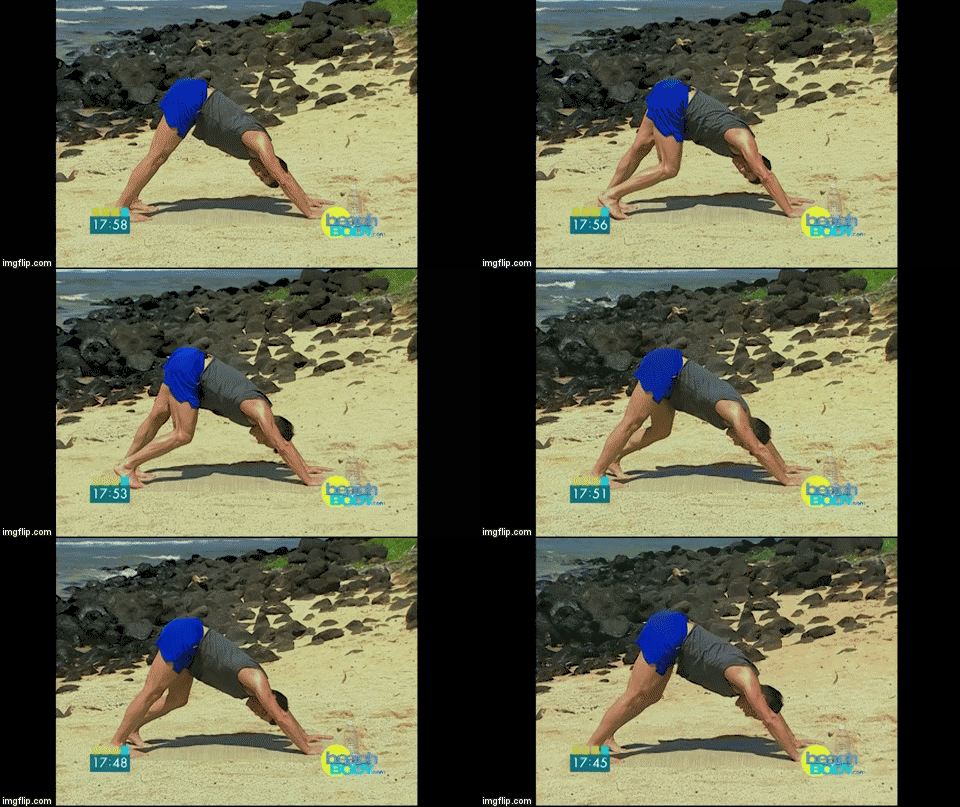
6. Downward Facing Dog with Alternating Heel March
Extends and loosens hamstrings, calves, and upper back.
Source: Ho’Ala ke Kino
To Do This Exercise:
1. Assume a push-up position: face down, hands and balls of your feet on the floor, body straight from your heels to the top of your head.
2. Keeping your arms and legs straight and your lower back in its natural arch, fold at the hips and press your hips into the air.
3. With your feet parallel, slowly bend your right knee until you feel a deep stretch in your left calf, then hold for ten seconds.
4. Straighten your right knee, then repeat on the other side.
5. Continue alternating sides for a total of three reps per side.
If It Hurts:
Hold the downdog position without the heel march.
LEVEL II: Use these moves when your lower back pain is less severe. They can help strengthen and stabilize the core.
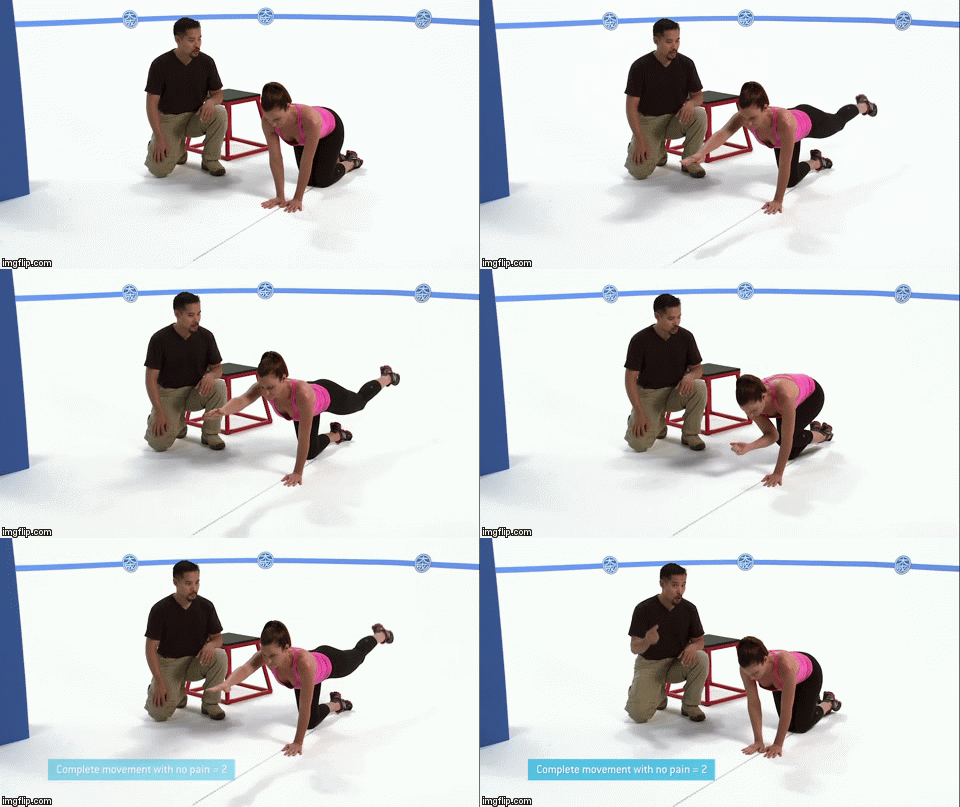
7. Bird Dog
Tones extensor muscles of the upper back, shoulders, and glutes, while teaching back musculature to work with greater coordination and ease.
Source: Tai Cheng, Function Test
To Do This Exercise:
1. Assume an all-fours position on the floor, hands directly below your shoulders, knees directly below your hips.
2. Slowly extend your right leg behind you as if kicking something with your heel.
3. Simultaneously extend your left arm forward, straight and parallel to the floor.
4. Hold for 10 seconds, slowly lower your right left and left arm, then repeat the sequence using your left leg and right arm.
5. Perform 3–6 reps per side.
If It Hurts:
Contract your abs and flatten your back as much as possible throughout the move.
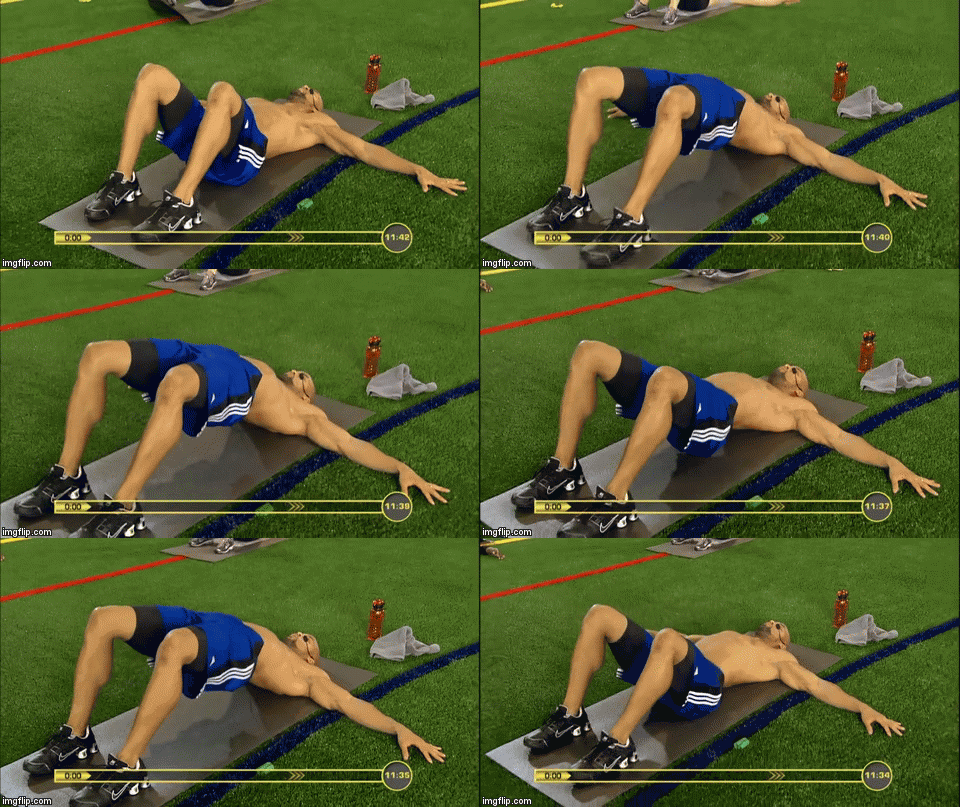
8. Glute Bridge
Increases tone in the glute muscles.
Source: INSANITY: THE ASYLUM, Back to Core
To Do This Exercise:
1. Lie on your back with your knees bent and your feet flat on the floor.
2. Flex your feet so the balls of your feet lift off the floor.
3. Drive your heels into the floor, squeeze your glutes and lift your hips as high as you can.
4. Pause for a one-count, return to the starting position, and repeat for 20 reps.
If It Hurts:
Limit the movement to a pain-free range of motion.
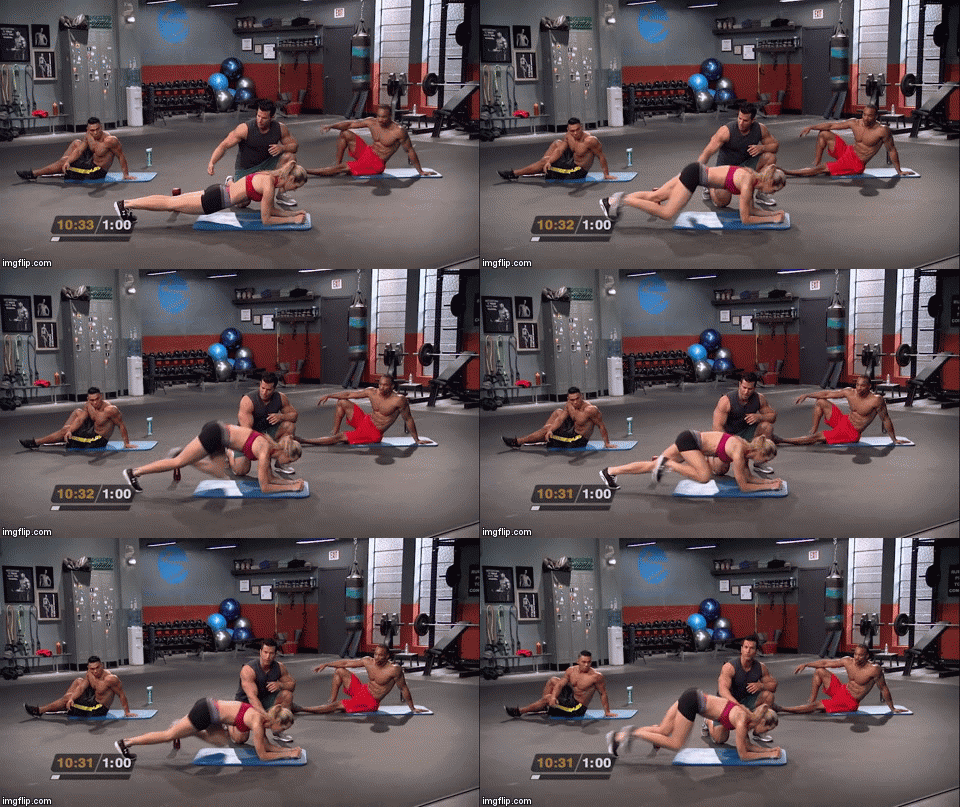
9. Plank with Forearm Run
Tones the six-pack muscles, relieving lower-back pressure.
Source: The Master’s Hammer and Chisel, 10 Minute Ab Hammer
To Do This Exercise:
1. Assume a plank position: face down, forearms and balls of the feet on the floor, body straight from your heels to the top of your head.
2. Keeping your hips down, bring your right knee towards your chest.
3. Reverse the move and repeat on the other side.
4. Alternate sides for 15–30 seconds.
If It Hurts:
Slow the movement down. Perform the move from the push-up position (arms extended). Perform a static plank position (no movement in the legs).
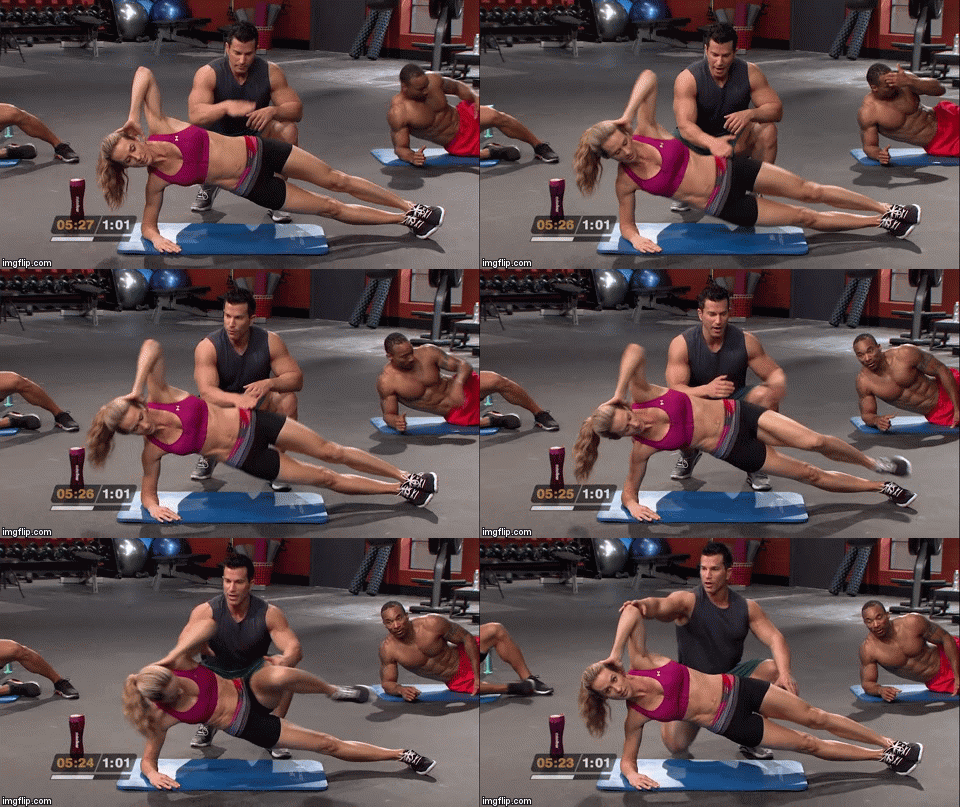
10. Side Plank and Knee Up
Tones the core muscles on the sides of your torso, which help you to bend and twist more easily.
Source: The Master’s Hammer and Chisel, 10 Minute Ab Hammer
To Do This Exercise:
1. Assume a right-side plank position: right elbow and forearm on the floor, feet stacked with the outside edge of your right foot on the floor, body straight from your heels to the top of your head.
2. Place your left hand behind your head and point your left elbow towards the ceiling.
3 Draw your left knee up and towards your chest.
4. Reverse the movement, then repeat for 12–15 reps.
5. Turn over and repeat the movement on your other side.
If It Hurts:
Hold the side plank position without movement.
LEVEL III: Use these moves when you’re feeling good to develop more spine-sparing mobility and endurance and help prevent future lower back pain.
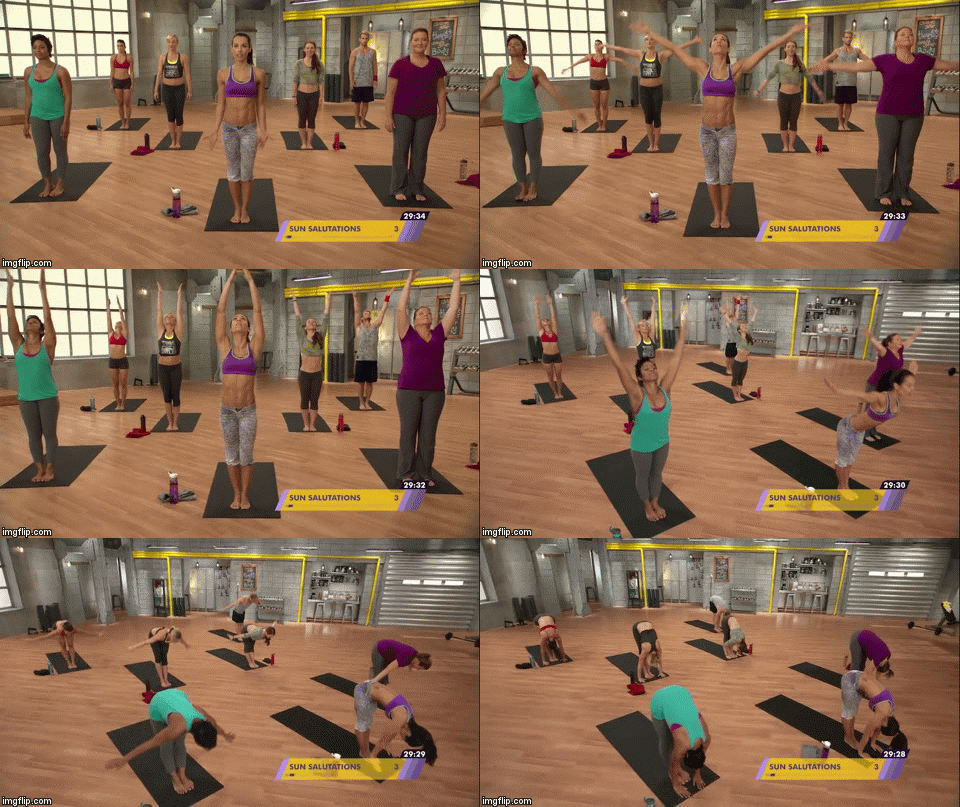
11. Front Fold
Relaxes and increases range of motion in your hamstrings, calves, lower and upper back.
Source: 21 Day Fix, Yoga Fix
To Do This Exercise:
1. Assume an athletic posture with your feet in a shoulder-width-and-a-half stance.
2. Inhaling deeply, slowly extend your arms directly out to the side.
3. Keeping your back flat and your knees slightly bent, slowly hinge forward at the hip joints as far as you can.
4. Cross your arms in front of you, slowly round your back forward.
5. Hold the rounded-forward position for 20–30 seconds.
If It Hurts:
Avoid the rounded-forward position: hinge forward at the hips and return to the starting position for 3–5 reps.
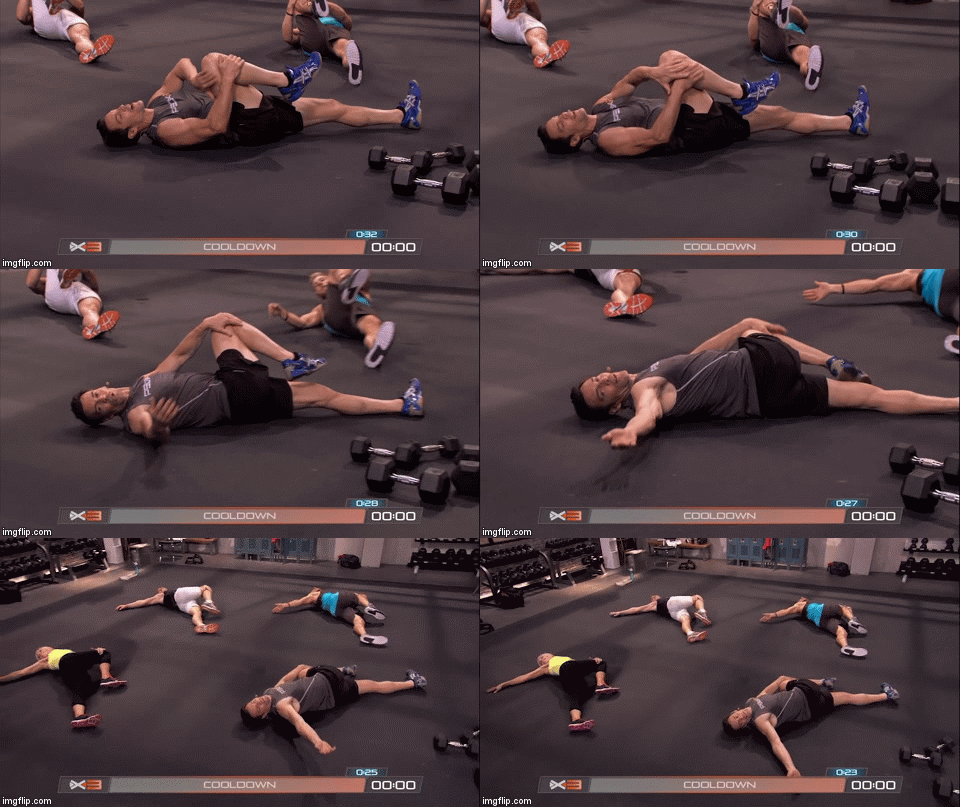
12. Trunk Twist
Increases rotational range in rib cage, allowing you to turn and twist more comfortably.
Source: P90X3, Eccentric Lower
To Do This Exercise:
1. Lie on your left side with your bottom (left) leg extended and your right knee bent towards your chest, inside of your right knee on the floor.
2. Extend your arms straight out in front of your chest, left arm on the floor and palms together.
3. Keeping both arms straight, your right knee and your left arm and shoulder blade on the floor, lift your right arm up towards the ceiling.
4. With your eyes on your right hand, rotate your right arm back towards the floor behind you as far as you can without pain.
5. Slowly return to the starting position and repeat for 15 repetitions.
6. Lie on your right side and repeat.
If It Hurts:
Place a pillow or block underneath the knee of your top leg and always rotate only as far back as you can without pain.
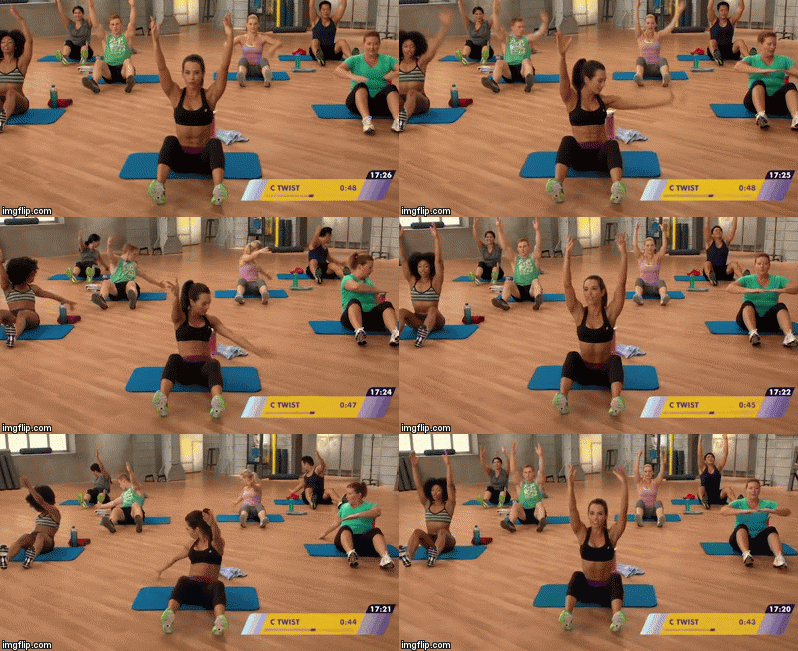
13. C-Sit Tap
Increases strength and endurance in your six-pack muscles and improves rotation in your upper back.
Source: 21 Day Fix, Pilates Fix
To Do This Exercise:
1. Sit on the floor with your knees bent, feet flat.
2. Lean back so that your torso forms a 45-degree angle to the floor and extend your arms in front of you, palms together.
3. Keeping your torso long, lean back slightly, rotate your right arm and shoulder back, and tap your right hand to the floor.
4. Reverse the movement, return to the starting position, and repeat the movement, this time turning to your left.
5. Alternate sides for 15 reps on each side.
If It Hurts:
Hold the “up” position without moving.
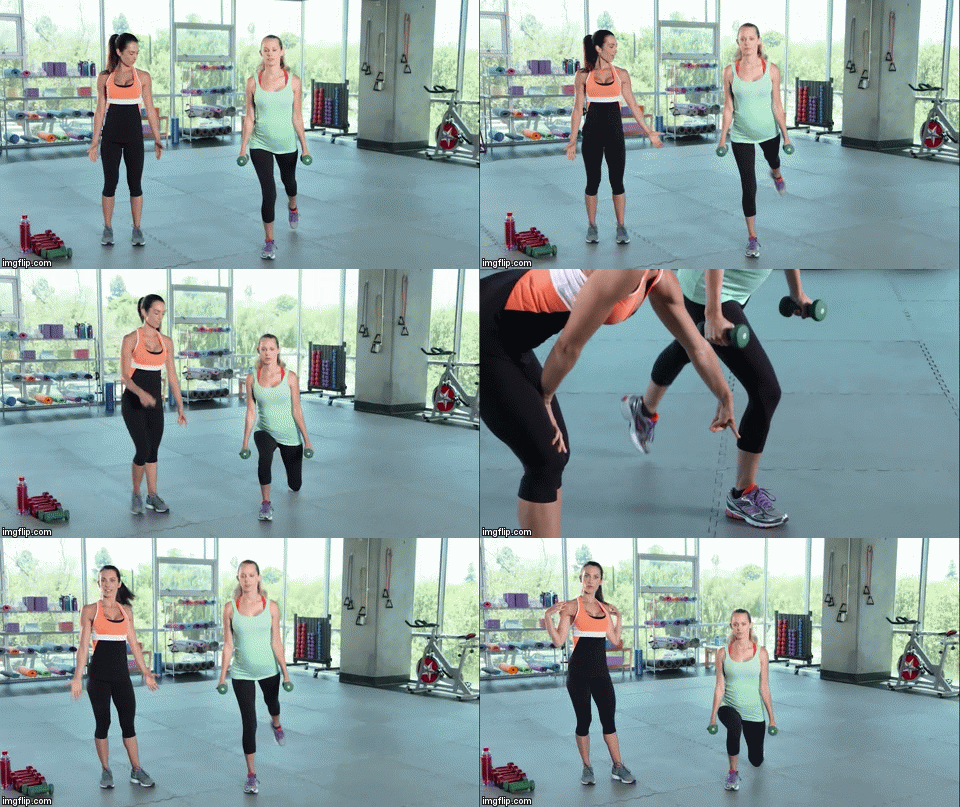
14. Lunge to Hip Extension
Strengthens glutes and lengthens hip flexors to improve posture and lower body strength and stamina.
Source: Active Maternity, Get Stable
To Do This Exercise:
1. Assume an athletic posture: feet shoulder width and parallel, knees slightly bent, shoulders square.
2. Step your right leg about two feet directly back.
3. Keeping your torso upright, bend both knees until your right knee comes close to the floor.
4. Reverse the move and return to the starting position.
5. Shift your weight onto your left foot, contract your right glute, and lift your right foot off the floor behind you.
6. Lower your right foot back to the floor and repeat the movement for 10-12 reps.
7. Switch your legs and repeat on the other side.
If It Hurts:
Lower your back knee only about halfway to the floor and keep your back foot on the floor throughout the movement.

