How to Do a Dumbbell Bent-Over Row

The dumbbell bent-over row might be an “old school” back exercise, but there are few better moves for sculpting a V-shaped torso — that “ideal” upper body physique that’s wide at the shoulders, narrow at the waist, and head-turning in a tailored shirt… or without a shirt at all.
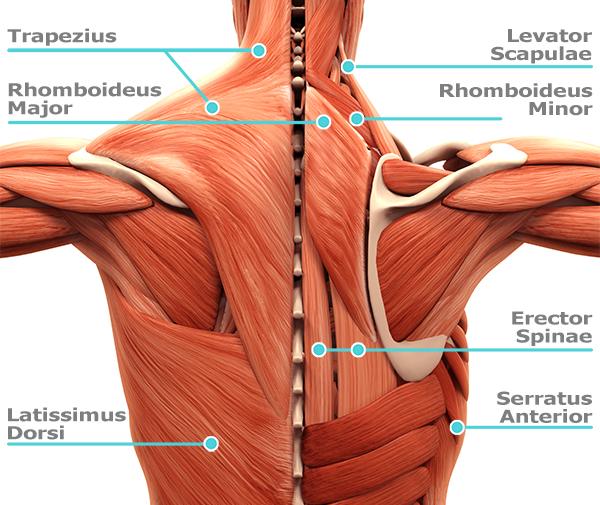
That’s because the bent-over row hits nearly every muscle in your upper and middle back — including your rhomboids, traps, and lats — while working your posterior deltoids (rear delts) and requiring you to engage your core to maintain stability.
Plus, it hits your biceps, giving you one more reason to add it to your weekly training plan.
Ready to give the bent-over row with dumbbells a try?
Bent-Over Row: Step-by-Step Instructions
The dumbbell bent-over row targets the upper and middle back muscles, as well as the shoulders, biceps, and core.
- Stand with your feet hip- to shoulder-width apart, holding a dumbbell in each hand with a firm grip. Brace your core, hinge at your hips, bend your knees slightly, and lower your torso until it’s nearly parallel to the floor.
- Let the dumbbells hang at arms length with your palms facing back. Engage your shoulder blades to keep your shoulders pulled back (i.e., don’t hunch). This is the starting position.
- Without moving your torso, and while keeping your elbows tucked and back flat, row the weights to your sides as you squeeze your shoulder blades together.
- Pause, and then lower the weights back to the starting position.
Tips for Bent-Over Rows With Dumbbells

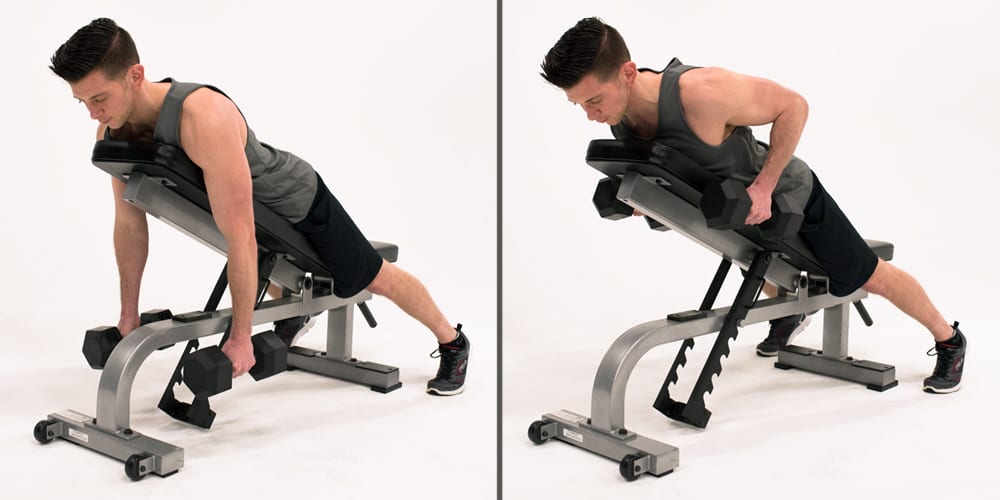
Make it easier: Do a single-arm row, placing your free hand on a bench for support, or do a chest-supported dumbbell row:
- Lie chest-down on an adjustable bench set to a low incline, and let the dumbbells hang at arm’s length, palms facing each other.
- Without moving your torso, and keeping your elbows tucked and back flat, row the weights to your sides as you squeeze your shoulder blades together.
- Pause, and then lower the weights back to the starting position.
Make it harder: Use heavier weights, or perform a batwing row:
- Assume the same starting position as the bent-over row, but pull your right dumbbell to your side (elbow tucked, shoulder blade pulled back), and keep it there as you perform 10 rows with your left arm.
- Switch arms and repeat to complete one set.
Bonus tip: As you perform the bent-over row with dumbbells, imagine there’s an orange between your shoulder blades, and try to squeeze the juice out of it as you lift the weights to your sides.
Squeezing your shoulder blades together ensures that you not only engage all of the right muscles, but also get the maximum benefit from each rep.
Bent-Over Row Muscles Worked

The bent-over row spares nearly no muscle in your upper and middle back.
Lats
Your lats (or latissimus dorsi) are the two fan-shaped muscles on the sides of your mid and lower back. They’re your main “pulling” muscles, meaning they’re responsible for bringing the arms toward your body and turning the front of your arms toward your chest.
As the biggest muscles in your upper body, your lats give your torso the “V” shape when they’re developed.
Trapezius
Your traps (or trapezius) are a kite-shaped muscle that run from your neck to your mid-back and out to your shoulders. They’re main function is to move and stabilize your shoulder blades.
They assist in movements like throwing, swinging, climbing, and carrying heavy objects.
Rhomboids
Your rhomboids are the upper back muscles underneath your traps that run from the inner edge of your shoulder blades to your spine. They activate to help draw your shoulder blades together (remember the orange?) as your row the weights up.
Bent-Over Row Variations
- Rocket launcher row
- Resistance row
- Wide bent-over row
- Lunge row with crunch
- Supinated bent-over row
- Barbell bent-over row
You can find this move in the INSANITY: THE ASYLUM Volume 2 workout, Back & 6 Pack. Want more basic moves? Click here.
