Why You Should Try the Windmill Exercise (and How to Do it)

If you’re thinking about trying the windmill exercise, you undoubtedly already know one thing: It looks and sounds really cool.
But we care about more than just appearances.
This exercise is just as good at building total-body stability, improving core strength, and working those all-powerful glutes, says Ryan Campbell, a kinesiologist and training specialist at Anytime Fitness of Southern Wisconsin.
Just like those windmills you see out in the fields, with the windmill exercise, all of the power comes from the center, he explains.
Here’s how to do the move with perfect form, a few fun variations, and all the benefits you can get from it.
How to Do the Windmill Exercise
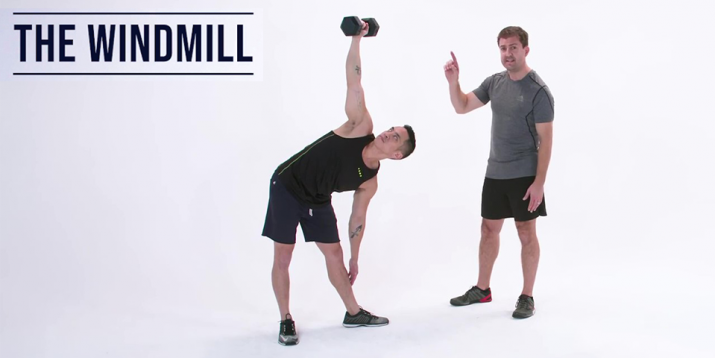
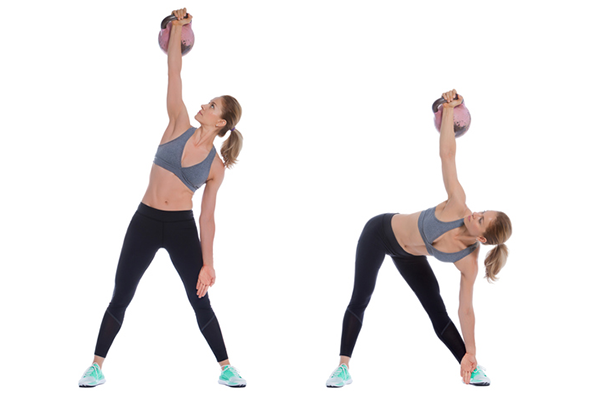
- Stand with your feet slightly wider than shoulder-width apart. Turn the toes of your left foot straight to the side at 90 degrees. Reach your right arm up to the ceiling and let your left hand hang down at your side. Look up at your right hand.
- Engage your core and push your hips toward your right side. Slide your left hand down your left leg toward your ankle as far as possible without putting pressure on your leg —use your core to stabilize yourself. Your left arm should be perpendicular to the floor the entire time. The right leg should remain straight. You can allow a slight bend in your left leg to avoid locking your knee.
- Pause, then push down through your feet to rise back up to start, keeping your core engaged and your spine long the whole time.
- Repeat all reps, then switch sides.
Windmill Variations

There are a number of ways you can perform the windmill exercise. Once you learn the proper form from above, then you can start adding in weight and trying more difficult variations.
Here are some of the most common windmill variations that build on the traditional single kettlebell windmill exercise:
- Low kettlebell windmill: Hold a kettlebell in your right hand, pressed straight up toward the ceiling. Let the bell hang on the back of your wrist, and maintain a neutral wrist. Turn the toes of your left foot straight to the side at 90 degrees. Brace your core.
- Dumbbell windmill: Instead of using a kettlebell, hold a dumbbell in your raised arm. This is slightly more challenging to the shoulder stabilizers, and is just handy if you don’t have a kettlebell.
- Bottom-up: Hold the kettlebell upside down with your hand wrapped firmly around the handle, and the bottom of the bell facing the ceiling. This is incredibly challenging for both the shoulders and grip.
- Double-kettlebell: In addition to holding a kettlebell overhead, hold one in your lowered arm for extra resistance returning to start.
- Double-kettlebell with single rack: Do the double-kettlebell variation, but hold the bottom kettlebell in a rack position (resting right in front of your shoulder) throughout.
What Muscles Does the Windmill Exercise Work?

Hip extensors
Comprising the glutes and hamstrings, the hips are the powerhouse of the windmill exercise.
As you lower down in the exercise with proper form, you should feel a stretch in your hamstrings (not your waist).
Then, to rise up, focus on squeezing your glutes to push your hips back to center. Think of it as a sort of sideways deadlift.
Core
While your hips power the windmill exercise, your core is what keeps you from bending or crumbling mid-rep.
By keeping an engaged core, you’ll keep your torso strong and stable so you can move more weight — and with better, safer form.
Shoulder
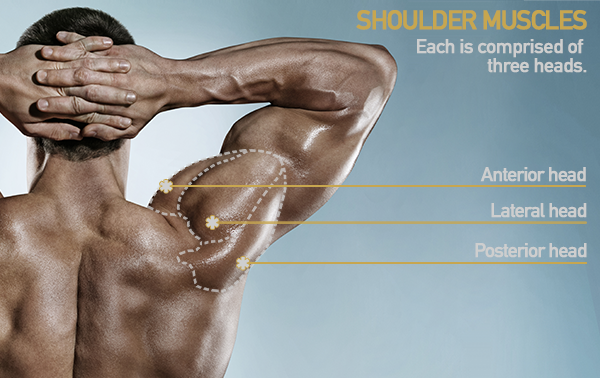
After helping you first get the weight placed overhead, the shoulder muscles (including both the deltoids and rotator cuff muscles) work hard to keep that weight in place and from teeter-tottering around.
When performing this exercise, you will likely notice that one of your shoulders is somewhat stronger or more stable than the other.
Windmill Stretch
A similar name, but a very different move, the windmill stretch can help to balance out all that hard work you did with the windmill exercise. This stretch involves laying down and stretching your back, increasing your range of motion, and relax your spine.
- Lie on the right side of your body, arms extended in front of you at shoulder height, and palms together. Bend your knees to 45 degrees, so your knees are just below hip height.
- In an arc movement, reach your left arm up toward the ceiling and over to the left, following it with your gaze. Aim to get your arm and both shoulder blades on the floor, but only go as far as is comfortable, Keep your legs planted on the ground.
- Return your arm to center, back on top of your other arm. Complete all reps, then repeat on the other side.
