10 of the Best Stability Ball Exercises
Want to know the secret for strengthening your core, protecting your joints, and getting more muscle-building benefits out of every workout? It’s stability. Or, a stability ball, to be exact.
Also referred to as an exercise ball or a balance ball, stability ball exercises can take your workouts to the next level.
“Stability ball workouts help to teach the body to move as one unit,” explains Cody Braun, NASM performance enhancement specialist.
“When performing stability ball exercises, the muscles that make up the core and surround the hips and shoulders have to work together to keep the body strong through a full range of motion.”
Increased stability is useful for many reasons, both in and out of the gym. Stable joints are less prone to injury, because they have the strength to stay in the correct position during taxing movements.
Additionally, being able to move your body as one cohesive unit helps when it comes to weightlifting, running, and other athletic endeavors, Braun says.
Ready to start sculpting your muscles and improving your stability? Try these 10 stability ball exercises that can be done in the gym or at home.
1. Stability Ball Jackknife
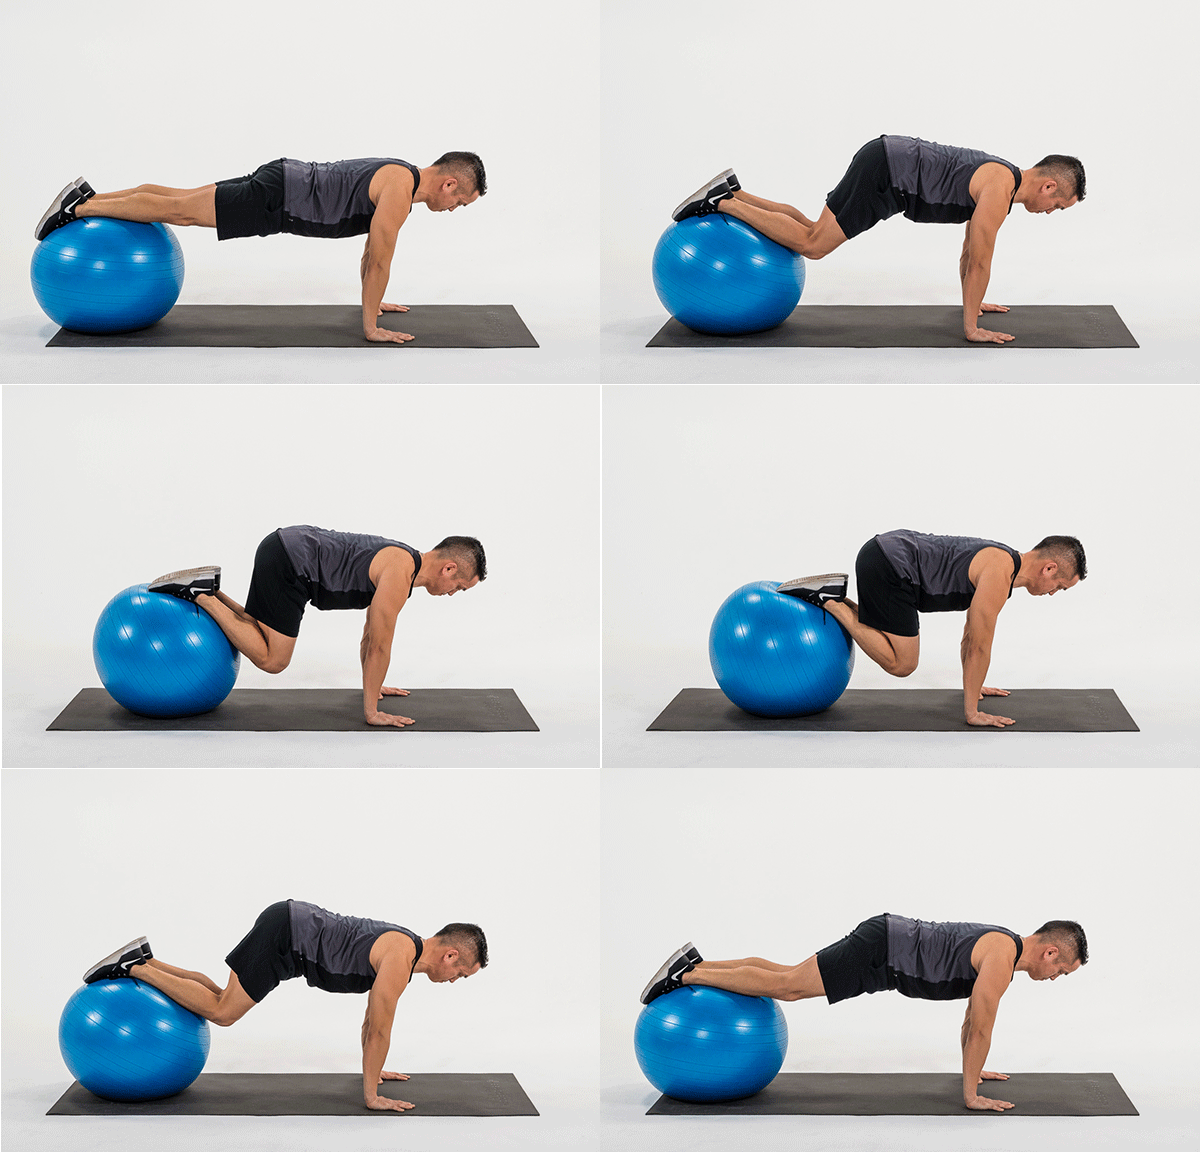
Benefits: This core exercise does double duty by strengthening the hip flexors and crunching your abs.
- Get in a high-plank position with your hands directly underneath your shoulders and your shins on top of a stability ball.
- Brace your core to keep your body in a straight line from head to toes. This is your starting position.
- Squeeze your core and bend your knees to roll the stability ball toward your hands until only your toes are resting on the ball, keeping your hips down as you do so.
- Pause, then slowly straighten your legs back behind you, returning to the starting position.
2. Stability Ball Hamstring Curl
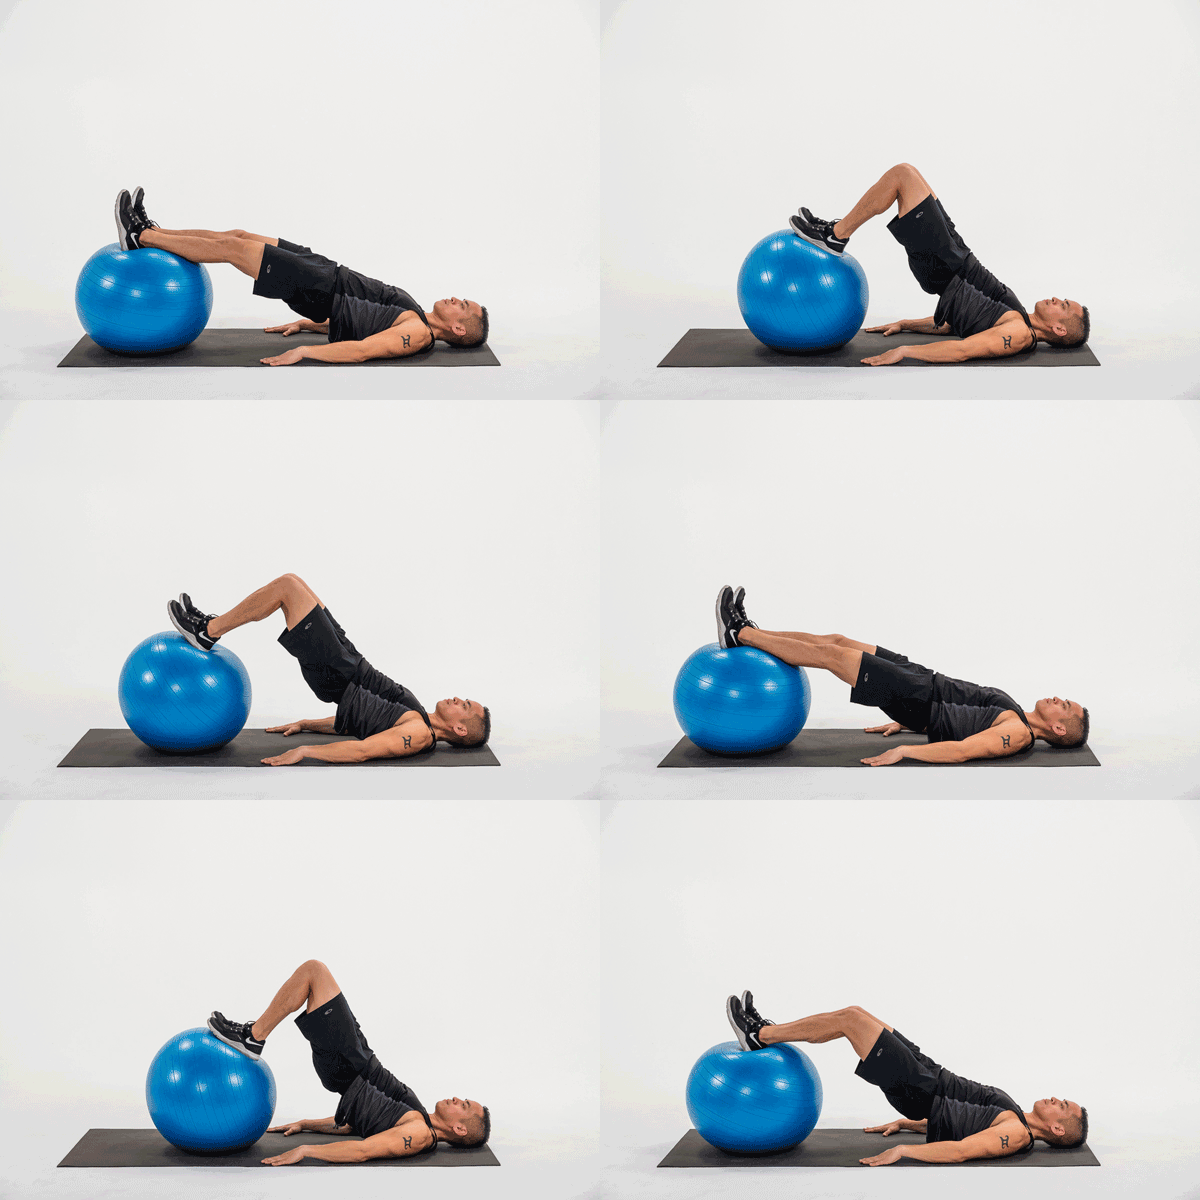
Benefits: Strengthen your hamstrings and glutes with this seemingly simple move, while also engaging your core.
- Lie with your back flat on the floor with the back of your calves on top of a stability ball and your legs straight.
- Brace your core and squeeze your glutes to raise your hips off of the floor so that your body forms a straight line from shoulders to heels. This is your starting position.
- Drag your heels to roll the ball as close to your butt as possible or until your knees form 90-degree angles.
- Pause, then slowly straighten your legs as you roll your feet away from your glutes, returning to the starting position.
3. Stability Ball Deadbug
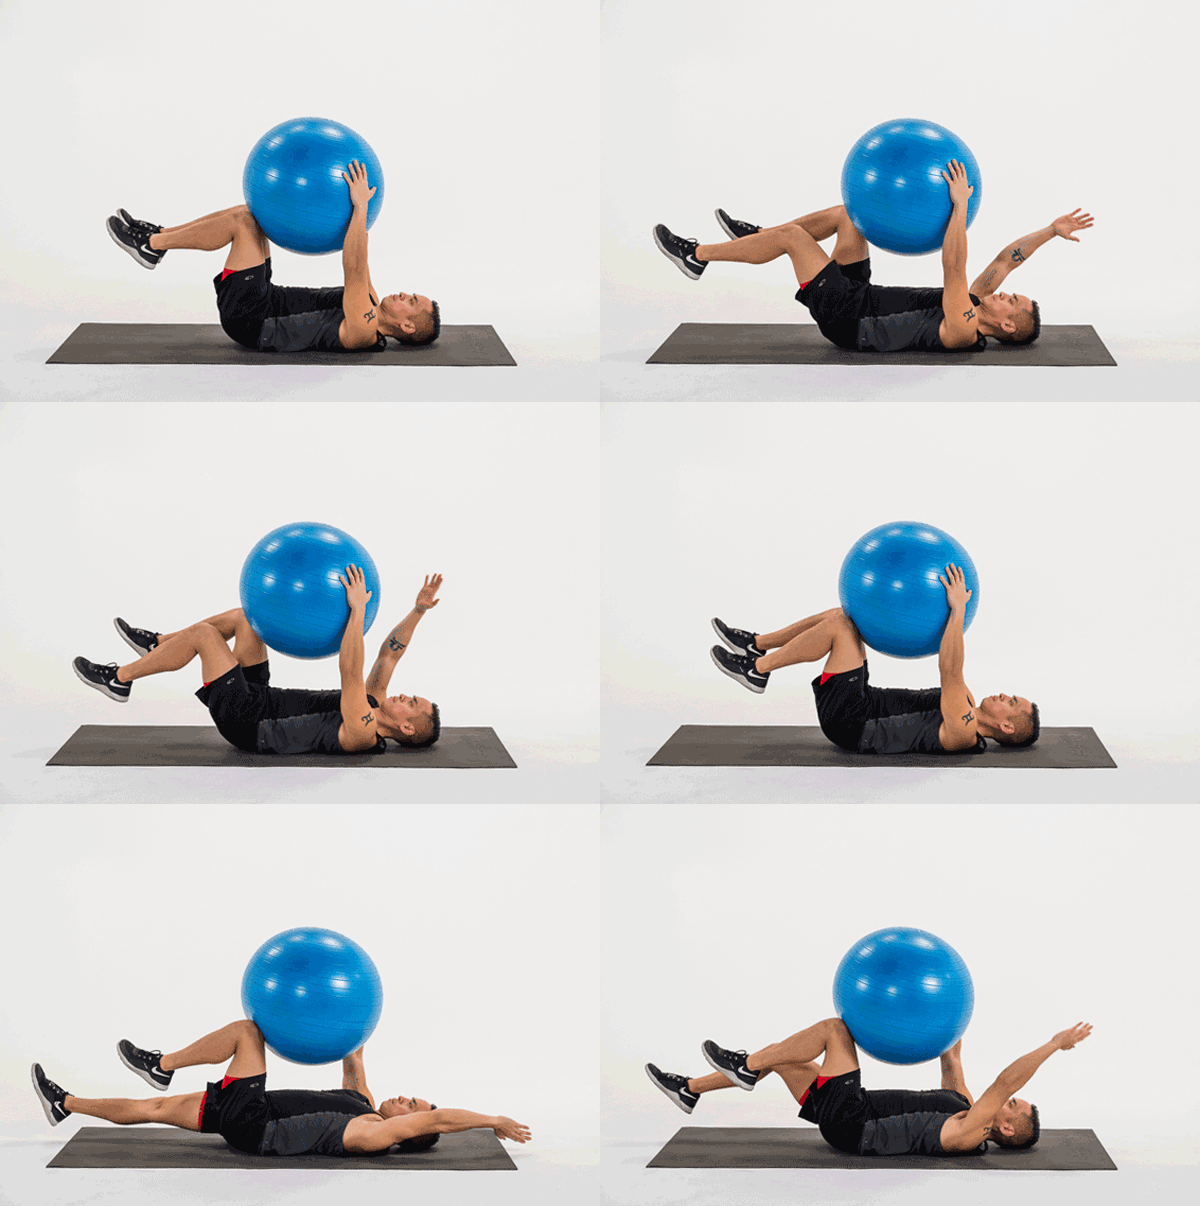
Benefits: Deadbug exercises teach your core to work as it was designed to do — keeping your spine stable while your arms and legs do their own thing. This variation cranks it up a notch by requiring an extra ab squeeze to keep the stability ball in place, while also targeting your obliques.
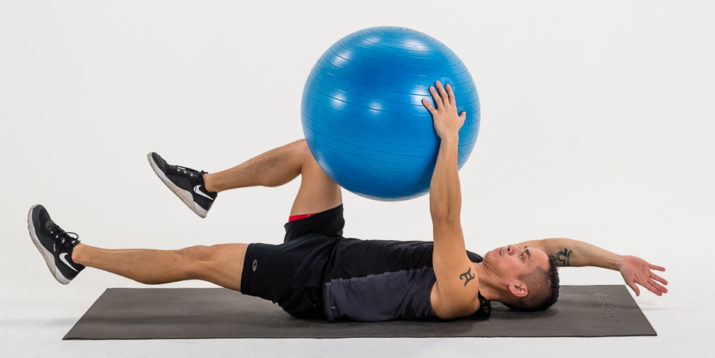
- Lie with your back flat on the floor with your arms extended straight up, your legs bent at 90 degrees, and holding a stability ball between your knees and your hands. This is the starting position.
- Keeping the ball in place with your right hand and left knee, brace your core and slowly lower your right leg and left arm to within six inches of the floor (both should remain in line with your body). Only go as low as you can with your low back pressing in to the floor.
- Reverse the move to return to the starting position, and repeat on your other side.
- Continue alternating sides, performing equal reps on each side.
4. Stability Ball V-Pass
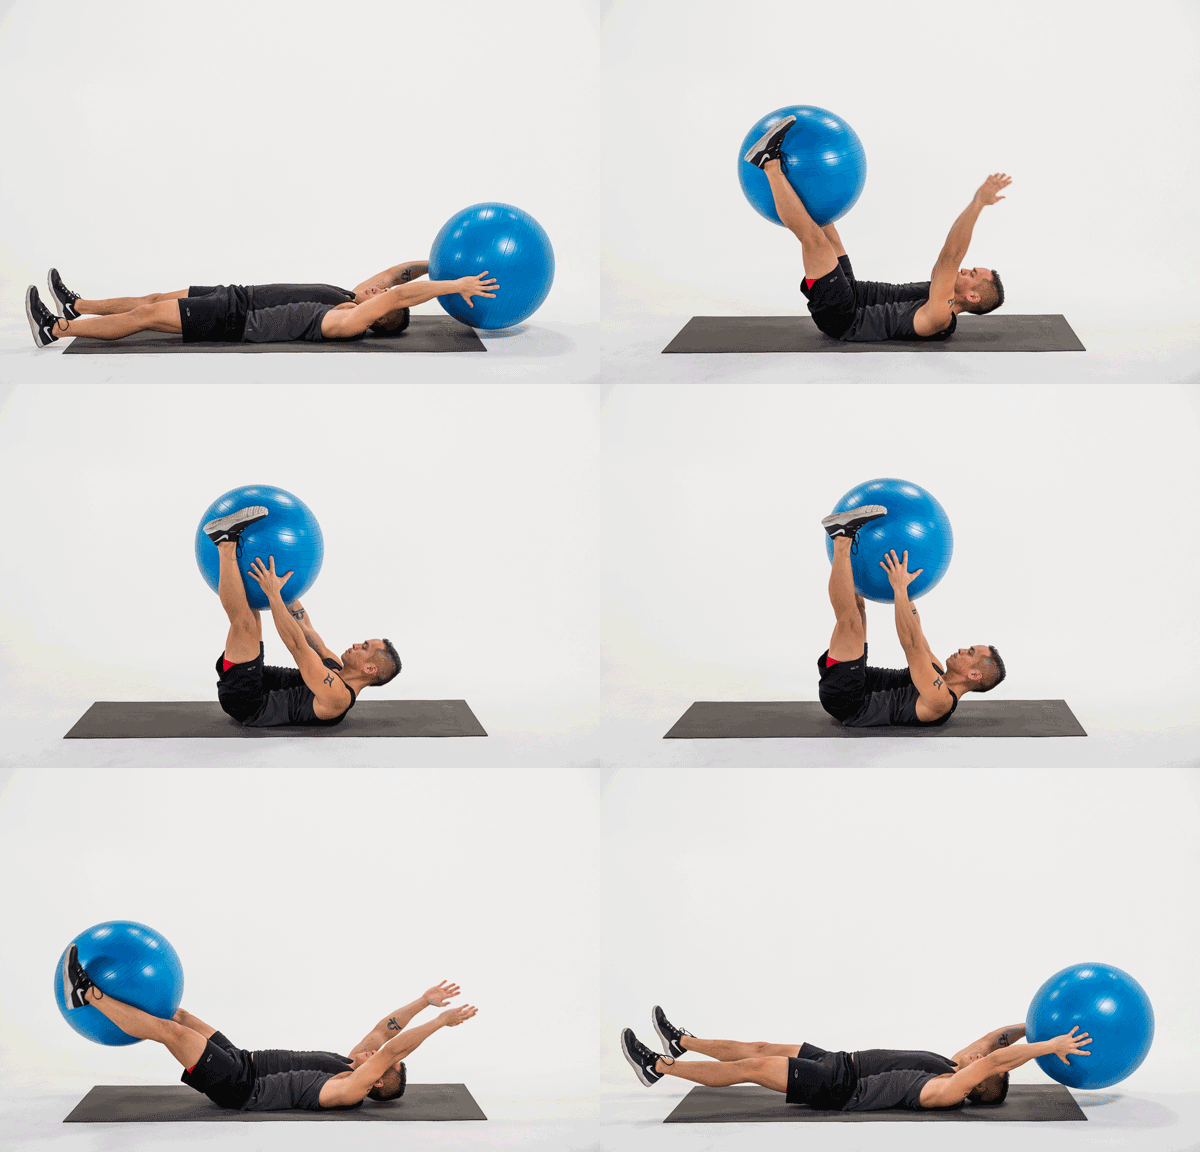
Benefits: Challenge your entire body with this next-level stability ball exercise. It works your core as you pass the ball between your hands and feet, and you have to engage your inner thighs and arms to keep the ball from falling to the ground.
- Lie with your back flat on the floor with your legs extended straight on the floor, holding a stability ball overhead with both hands. Brace your core to minimize any arch in your lower back. This is your starting position.
- Squeeze your abs to lift your arms and legs to place the ball between your calves, creating a “V” position.
- Lower back down to the starting position, but this time with the ball between your legs.
- Repeat the movement, passing the ball back and forth between your hands and legs.
5. Stability Decline Push-Up
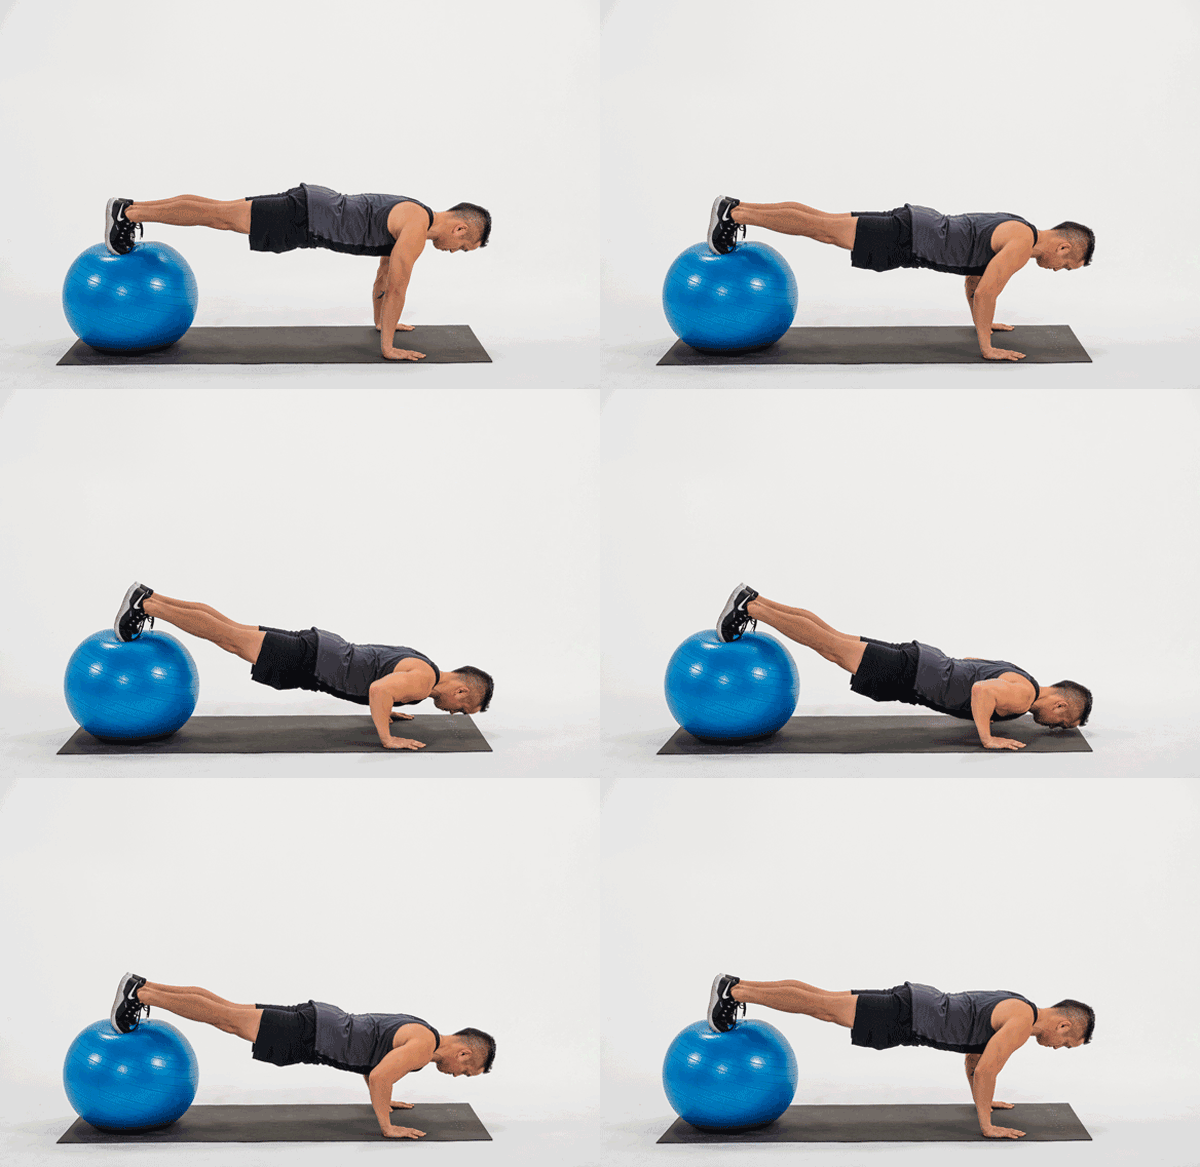
Benefits: This advanced bodyweight move is a version of a decline push-up that challenges your core just as much as your arms. You should be able to perform regular push-ups with confidence before taking on this exercise. (Here are some tips to get better at push-ups.) You’ll find this move in the Body Beast workout, Beast Up: Chest Shoulders and Tris.
- Get in a high-plank position with your hands directly underneath your shoulders and your toes on top of a stability ball. Brace your core and squeeze your glutes to keep your body in one straight line from head to toes for the entire move.
- Bend your elbows to lower your chest toward the ground, keeping your elbows tucked close to your body. They should form a 45 degree angle to your torso when viewed from above.
- Press your arms straight to return to the plank position and repeat.
6. Stability Ball Wall Squat
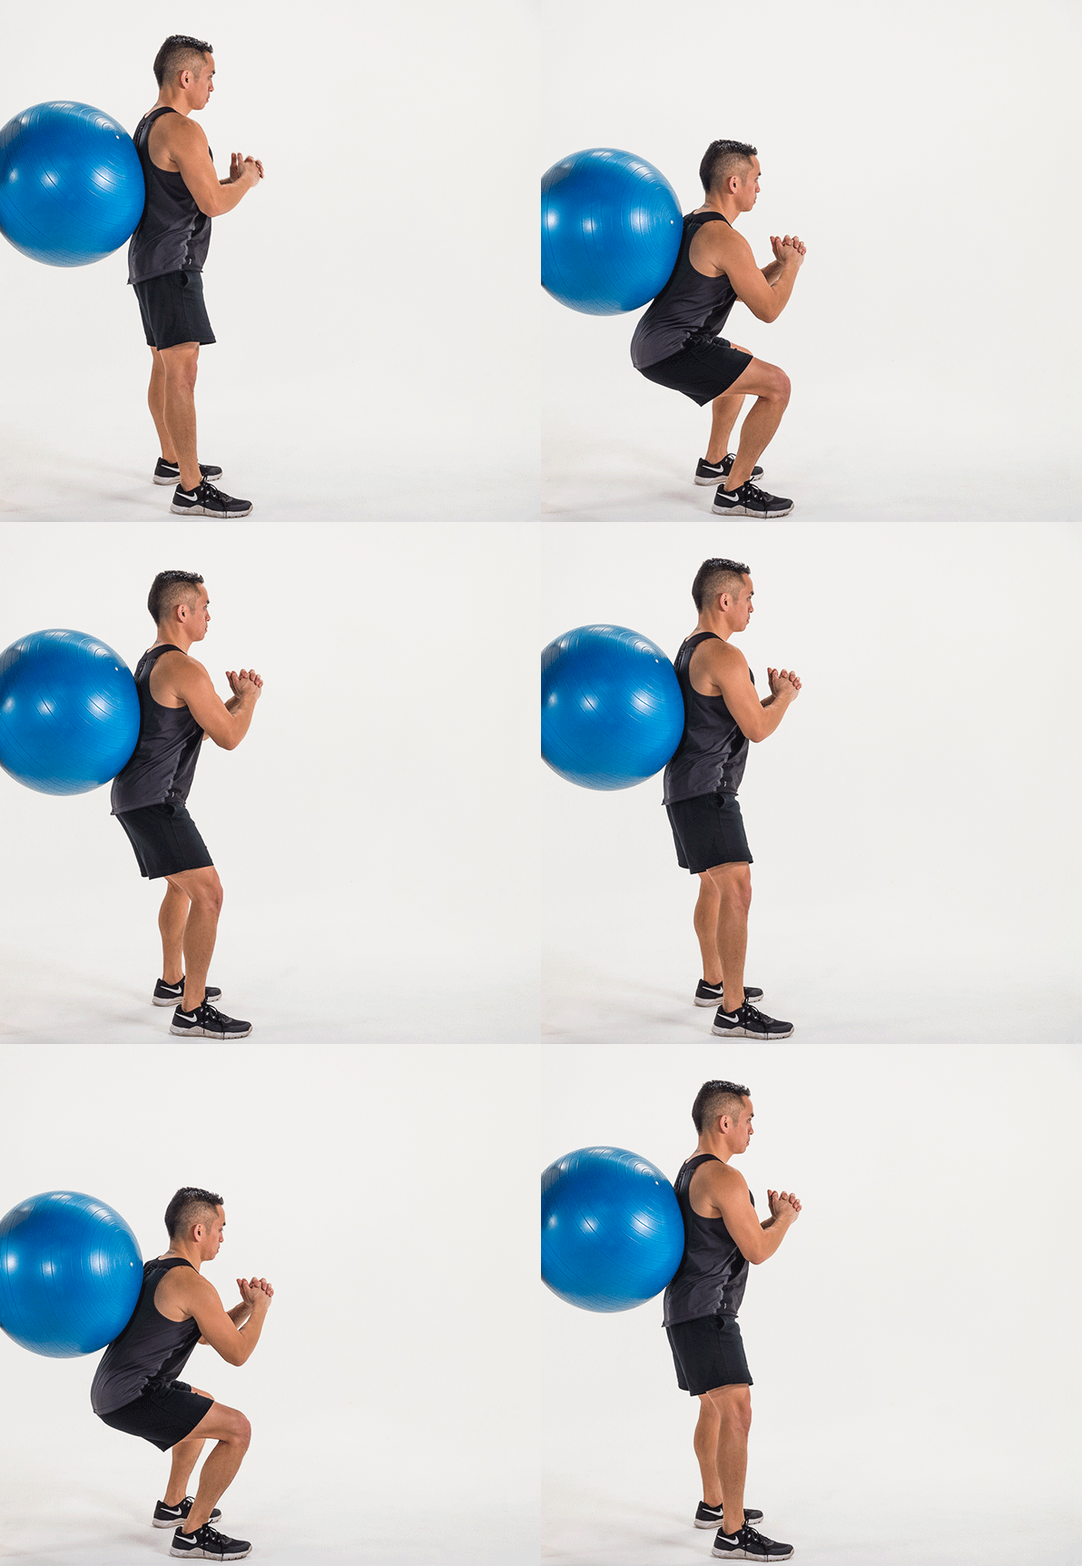
Benefits: Strengthen your glutes, hamstrings, and quads while building stability through your hips and core. Perform back-to-back reps, or hold each rep as long as possible.
- Stand with your feet hip-width apart and a stability ball between the middle of your back and a wall. Your feet should be slightly in front of your body. This is your starting position.
- Bend your knees to roll your body down the ball until your thighs are parallel to the floor. Your knees should be in line with your middle toes
- Pause, then press through your heels to return to starting position and repeat.
- Make this move harder by holding a dumbbell in each hand.
7. Russian Twist
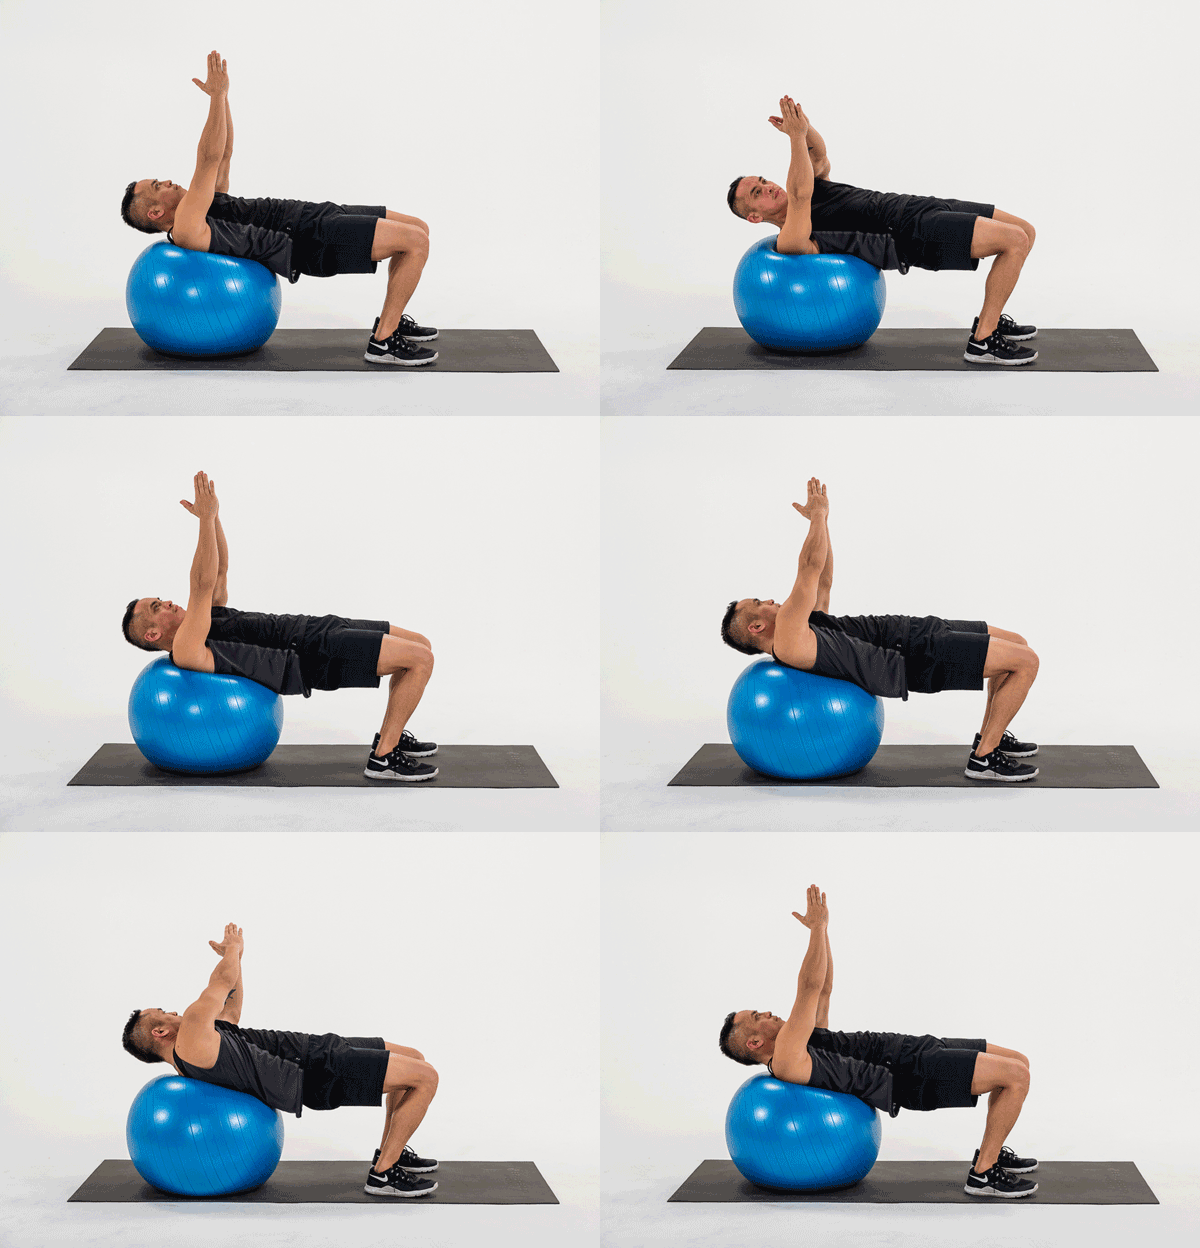
Benefits: Improve your core’s stability and rotational strength in one simple move that really targets your obliques and transverse abdominis.
- Lie with your upper back on a stability ball and your feet flat on the floor with your knees bent at a 90 degree angle. Brace your core and keep your hips extended so your torso forms a straight line from head to knees.
- Extend your arms straight above your chest and press your palms together. This is your starting position.
- Rotate your torso to roll onto one shoulder as far as you can while raising the other from the ball. Your hips should stay square with the floor.
- Reverse the move to return to the starting position.
- Repeat, rolling onto the opposite shoulder
8. Single-Leg Stability Ball Hip Thrust
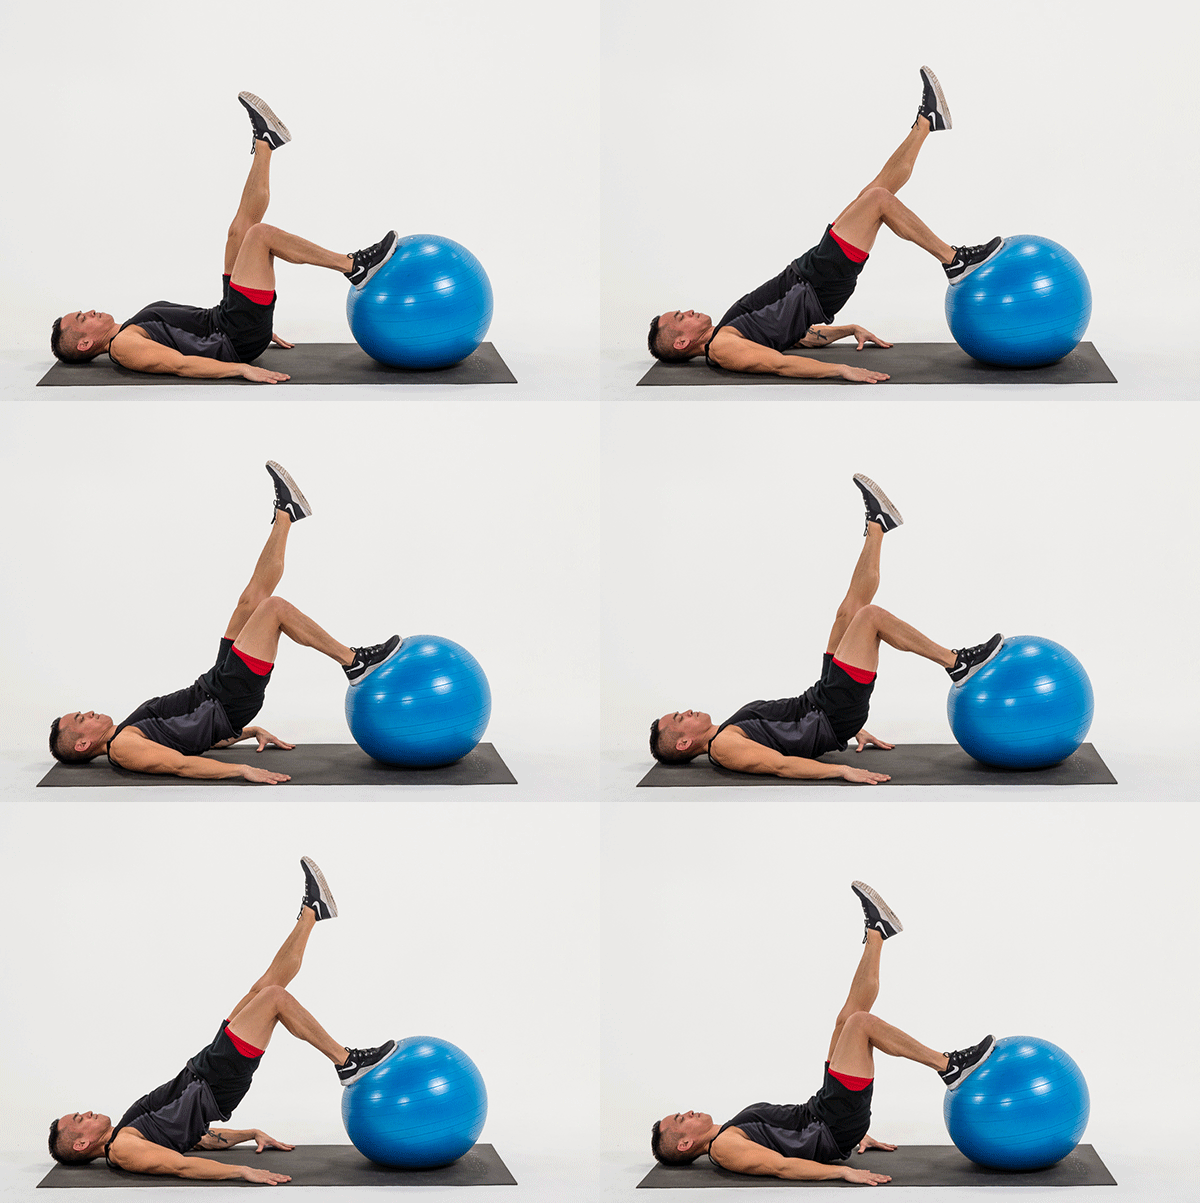
Benefits: This advanced hip thrust variation builds your glutes and hamstrings by training one leg at once, helping to correct any muscle imbalance between legs. Using a stability ball rather than bench hones in on single-leg hip stability even further. Practice with both feet flat on the floor, and then both feet on the ball before graduating to this advanced move.
- Lie with your back flat on the floor and both feet on a stability ball, legs bent at a 90 degree angle. Rest your arms straight on the ground by your sides.
- Lift one foot off the ball and extend it out straight.
- Squeeze your glutes to thrust your hips off the ground. Brace your core so that your torso forms a straight line from head to knees.
- Pause, then slowly lower your hips back to the ground.
- Perform all reps, then repeat on the opposite leg.
9. Stability Ball “I-Y-T” Shoulder Raise
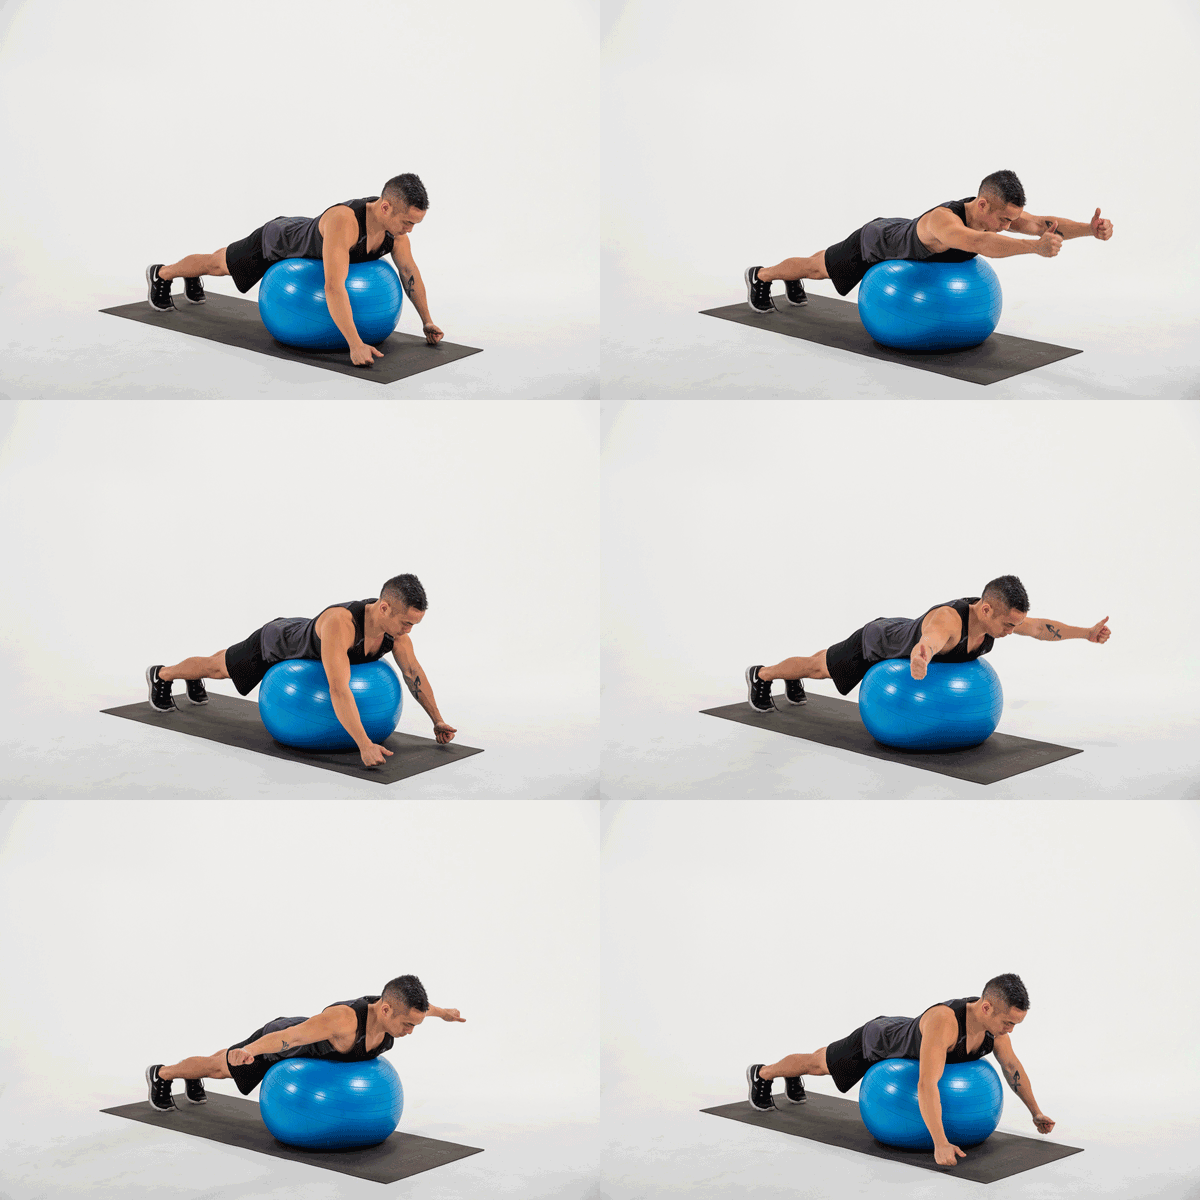
Benefits: Fend off the effects of sitting at a computer all day by training your shoulder stabilizers and mid-back muscles with this deceptively difficult exercise.
- Lie facedown on a stability ball with your stomach on a stability ball and your legs extended out straight behind you, digging your toes into the floor for support. Brace your core so that your body forms a straight line from head to heels.
- Let your arms hang straight toward the floor, holding your hands in fists with your thumbs up. Squeeze your shoulder blades down and away from your ears. This is your starting position.
- Leading with your thumbs, raise your arms straight up and close to your ears, keeping your shoulders pressed down. This is the “I” formation.
- Lower your arms down toward the floor, then lift your arms up again, but this time diagonally, making a “Y” formation.
- Lower your arms down toward the floor, then lift your arms straight out to your side to form a “T” formation with your palms facing the floor.
- The cycle of “I-Y-T” is one set.
- Make this move harder by holding a dumbbell in each hand.
10. Stability Ball Rollout
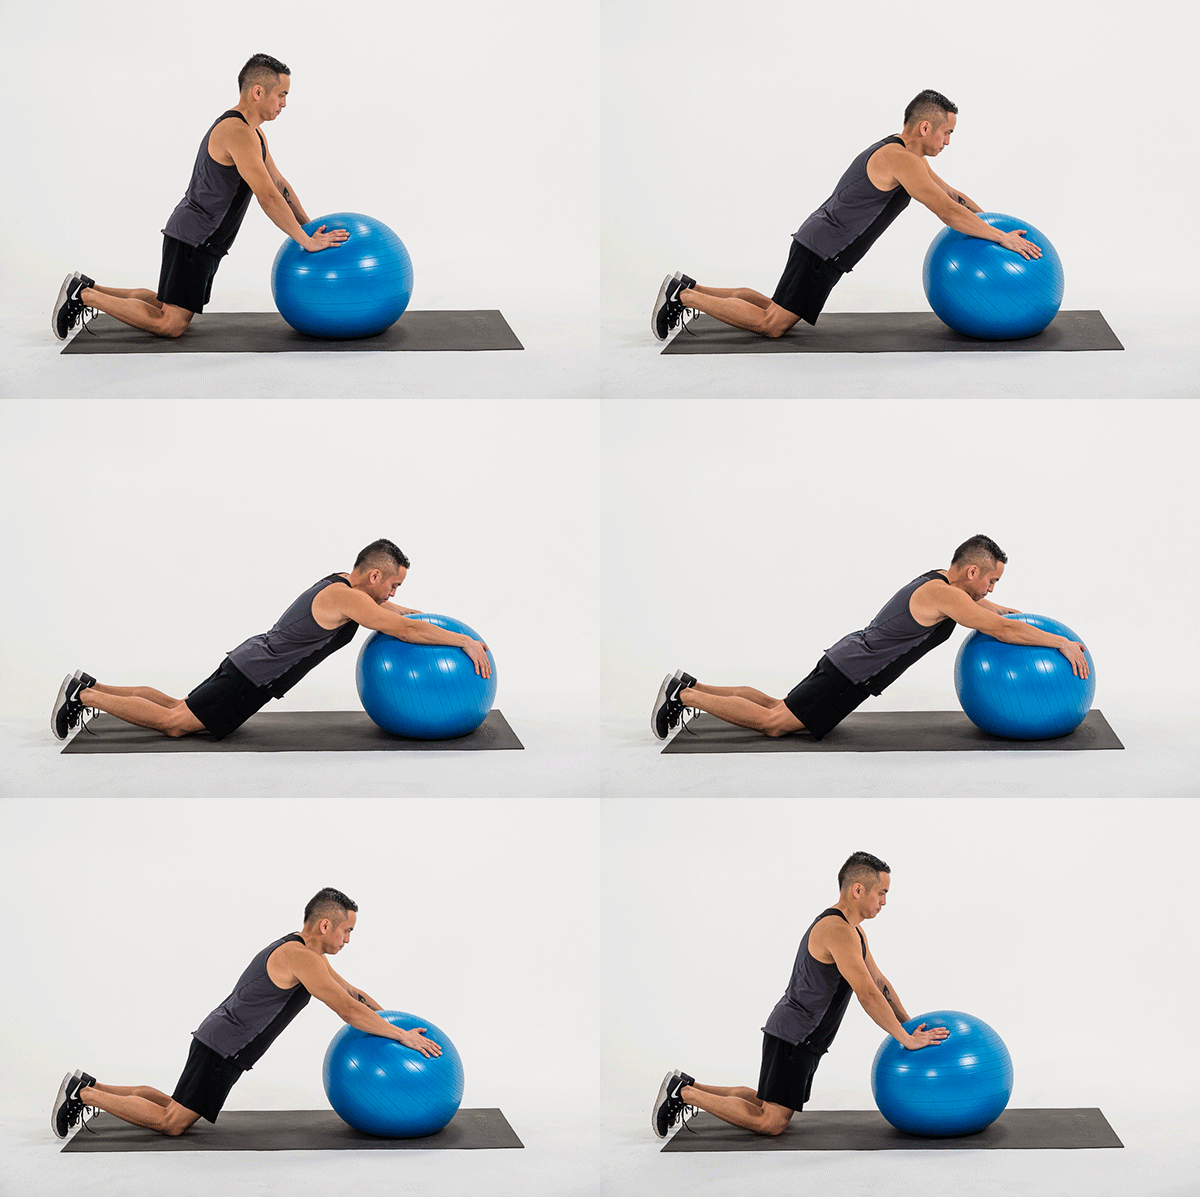
Benefits: This seemingly simple move will leave your abs shaking as it tests your core strength and stability.
- Place your hands on a stability ball and kneel with your knees hip-width apart and your toes on the floor for stability.
- Keeping your back flat and core braced, and without moving your knees, slowly roll forward so the ball comes to your forearms, until your body forms a straight line from your head to your knees.
- Pause, then roll back to the starting position.
How Do You Use an Exercise Ball?
You can use an exercise ball in a number of ways, and since it doesn’t take up a lot of space it’s an excellent piece of home workout equipment.
One common way to use a stability ball is as a substitute for a bench. (Many moves in Beachbody On Demand workouts can be done with either a bench or stability ball.)
If you’re accustomed to performing exercises with a stable bench, using an exercise ball will require firing up your core, hip, and shoulder stabilizers in a new way, Braun explains.
Just keep in mind that because of this extra requirement for stability, you should start by using less weight than you would use with a bench.
Stability balls also allow movement in exercises like ab or hamstring rollouts.
And you can use a stability ball as a sort of weight (a very large, light weight) and move it from one side of your body to the other, or pass it between your hands and feet.
What Size Stability Ball Should I Get?
Before you put your gym’s stability balls to use or buy your own, make sure you have one that’s the right size. Like any piece of exercise equipment, it’s important that your stability ball fits your body.
To find the perfect size, all you need to know is your height.
If you’re 5’4″ or taller, opt for a ball that’s 65 cm in diameter. If you’re shorter, 55 cm is best. (Beachbody offers balance balls in both sizes).
Use a tape measure to make sure that you have inflated your ball to the specified size — it should be firm to the touch, but still have some “give.”
